How to work with the DirectAdmin web hosting control panel. A step-by-step guide
- Home
- Blog
- Instructions
- How to work with the DirectAdmin web hosting control panel. A step-by-step guide
In the previous article about the DirectAdmin web hosting control panel, we gave a general overview of the system and its purpose. Now let us focus in more detail on the functions of the software product and the algorithm of actions that the user usually needs to do when working with the panel.
Basic support
If the customer wants and has the technical resources to administer the remote server on their own or with the help of qualified system administrators, they can choose basic technical support. This means that we deploy a virtual machine, install a control panel on it, and transfer all access rights to the client:
- full administrative access;
- user access — in case the customer wants to create a separate account.
By default, the user receives access with admin rights.
After we transfer the access details to the customer, this data is deleted from our media. The client is responsible for the operation of the operating system and software installed on the server. At the same time, we support system performance and are responsible for the operation of the physical infrastructure of data centers, the virtualization environment, and virtual equipment, and if necessary, we provide consulting assistance. Customers receive basic support for free.
Warranty support
If the customer needs our full assistance in the uninterrupted operation of the server and constant monitoring of its operation, warranty support is the perfect solution, which is free under certain conditions. With this type of support, we have administrative access, and we create a separate user-level account for the user.
In the case of warranty support, we are also responsible for the physical infrastructure of the data center, the virtualization environment, the virtual hardware, as well as the customer's operating system and software.
Now let us look at the typical sequence of steps that users usually do after logging into the hosting control panel, selecting the desired language, and configuring the interface — that is, the functions that we reviewed in the previous article.
Step 1. Adding a user without administrator rights
- For servers with basic support
The first step is to add a non-administrator user to host the user’s site without administrative rights. For this, you need to go to the Account Manager section and select Add New User.
When adding a user, you should specify the new user's desired login, password, email, domain name, and user package. In the item User Package --> Customize you can specify the limits that will be used by the created user, as well as the number of email accounts and the number of databases. In general, in this item, there is an opportunity to configure all the functionality that can be used by the user without administrator rights.
By default, there are unlimited, unless you use user package settings.
- For servers with warranty support
First, we create a user account in the server control panel. To do this, you need to specify the account name, password, email address, domain, and user package. If there is a specific domain, we specify it when creating an account. Otherwise, we use the default value, since it is not possible to create an account without it. The user package is preconfigured in the control panel of Tucha technical support specialists.
Step 2. Login to the server control panel
- For servers with basic support
After creating a new user, you need to go to the section Account Manager --> List Users, click on the name of the created user (login), and then click on the button Login as and enter the login.
It is also possible to enter the control panel from the standard login page: https://server_address:2222. After creating a user account, you can also use it to log in to the web hosting control panel on this page.
- For servers with warranty support
After the account for the user is created, the client receives access details to the contact e-mail address specified by them. An administrator can still log in under the user account using the control panel capabilities if there is a need.
All subsequent steps are the same for both basic support and warranty support servers.
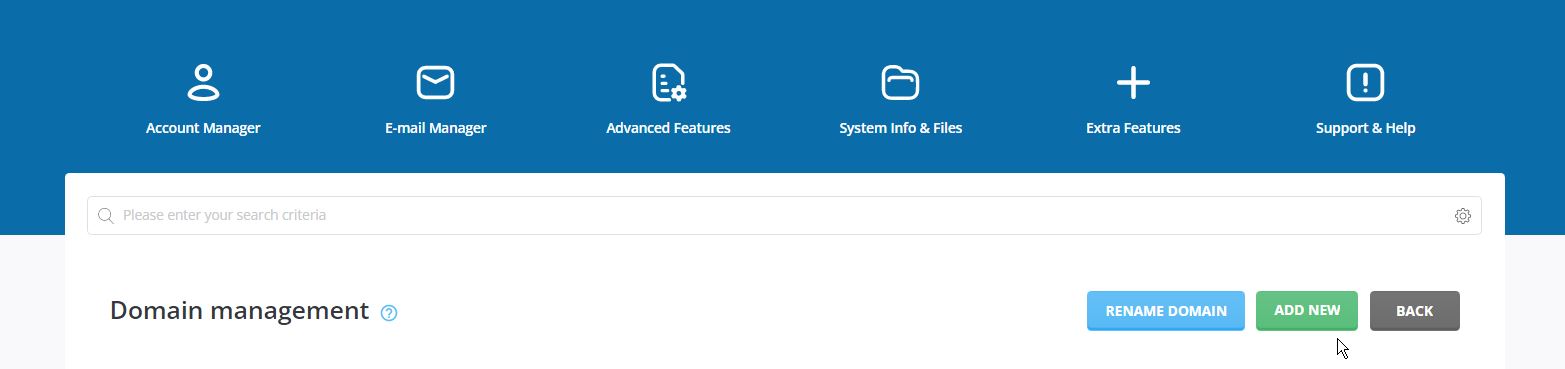
Step 3. Adding additional sites
If the user needs to add additional sites, go to Account Manager --> Domain management and select Add New. When adding a new site, you can specify whether the website will use an SSL certificate, PHP and CGI. The PHP option is enabled by default.
Step 4. DNS Management
The user can configure the domain to full service of DNS settings by the server. To do this, you need to go to the section Account Manager --> DNS Management.
DNS records with type NS show the NS settings to be specified in the Domain Name Registrar panel. After that, all subsequent actions with changing DNS should be carried out in the section Account Manager --> DNS Management. In this section, you can add, modify or delete DNS records.
If you plan to delegate the domain to the NS server of the DirectAdmin panel, you need to specify the appropriate address of the NS server in the domain control panel (usually the address of the NS server is specified in the same section Account Manager --> DNS Management). After that, all changes to DNS settings in the control panel will take effect.
If the domain is not delegated to the NS server of the DirectAdmin control panel, all its settings remain in the domain control panel on the registrar's site, and the data displayed in this section of the panel will not affect the domain's operation.
Step 5. Installing an SSL certificate
Installation of the certificate is carried out in the section Account Manager --> SSL Certificates. In the upper part of the panel interface, in the item Domain, you should select the domain name for which you want to install the certificate.
If you need to install a free SSL certificate, you should select the option Get an automatic certificate from ACME Provider. In the ACME Provider section, we recommend choosing Let's Encrypt. The rest of the settings can be left unchanged (they are set by default), except for the subsection Certificate Entries — here it is possible to select subdomains for which the issued free SSL certificate will also be valid.
Also, at the bottom of the interface of this page, you can enable the option Force SSL with HTTPS redirect, which will automatically redirect the site to the HTTPS protocol.

If the client has its own pre-generated SSL, you need to click on Paste pre-generated certificate and key and enter the necessary data in the fields Key (RSA) and Certificate (usually this is a chain from the contents of the .crt + ca.bundle files).

Step 6. Creating additional FTP accounts
To create additional FTP accounts in the Account Manager section, select the FTP Management item and click the button Create FTP Account. On the page that opens, enter FTP username and password (it is possible to immediately generate a random password).
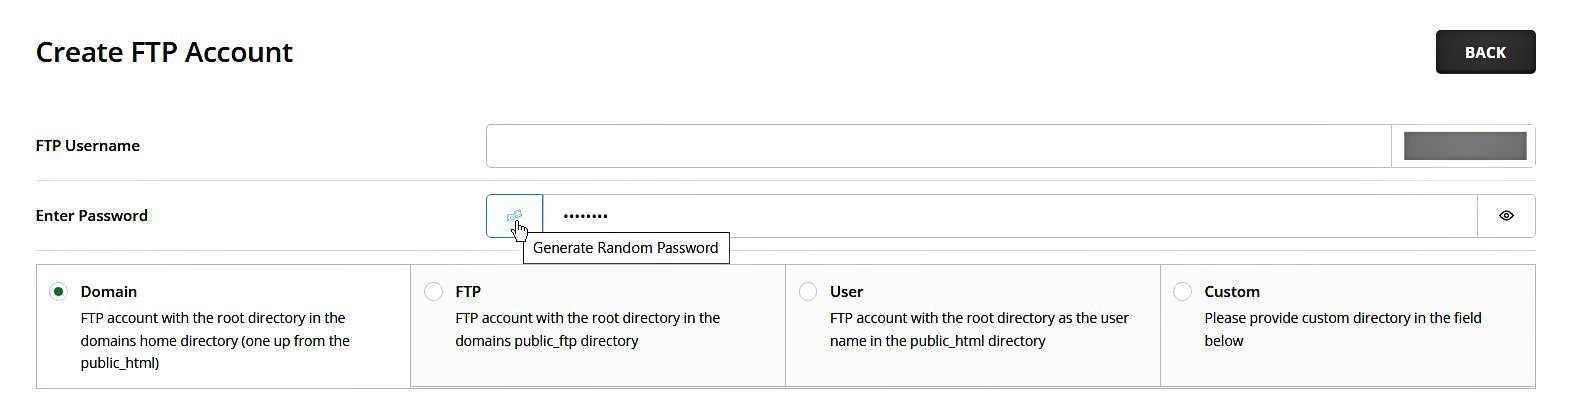
When creating an FTP account, the user is given a choice of the home directory for the FTP account:
- Domain is an FTP account with a root directory in the domain's home directory (one level above public_html).
- FTP is an FTP account with the root directory in the public_ftp domain.
- User is an FTP account with the root directory with a username in public_html.
- Custom is an FTP account with the desired home directory.
If you need FTP access to all files of the account, we recommend you select the item Custom, leave the Directory line as default, and click the button Create.
Step 7. Adding a database
The user can add a database that will be used by a site or several sites or databases for each site.
To add a database, go to Account Manager --> MySQL Management --> and press the button Create Database. The database creation page will open, where you must specify the Database Name and Database User. By default, the database name and username are the same, thanks to the active option Same as database name.
The database prefix and the user prefix are required — the user's name (login) and the underscore.
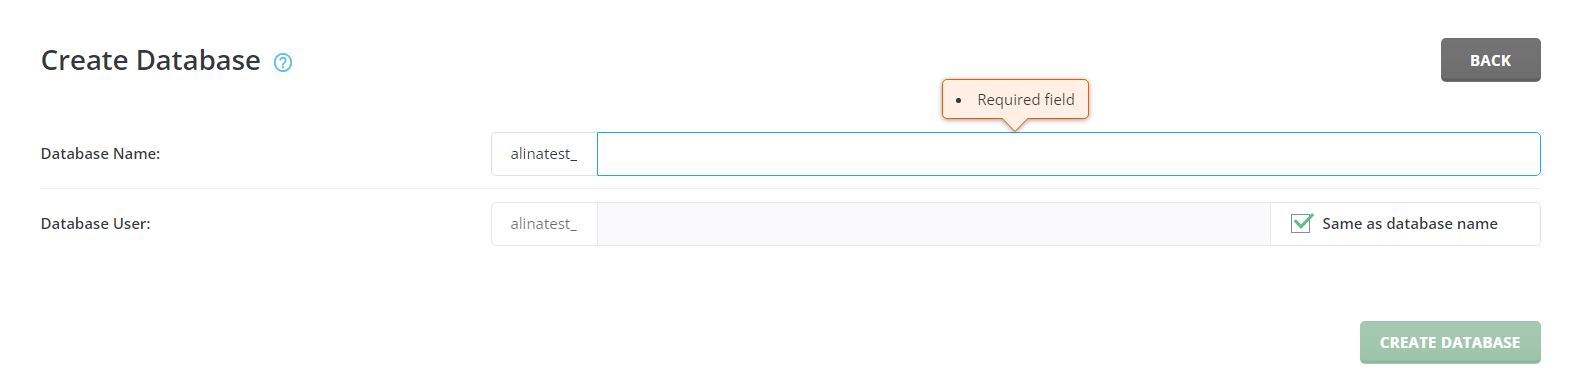
If you need to upload an existing .sql dump to a specific database, in the Account Manager --> MySQL Management section, click the Upload Backup button, then Select Database and drag the desired file into the appropriate field for upload.

Step 8. Adding mailboxes
The function of adding mailboxes is available in the section E-mail Manager --> E-mail Accounts.
By default, a mailbox is created for each domain, it is not necessary to delete it. To add a new mailbox, you need to select a desired domain name in the Domain item at the top of the panel interface and click the button Create Account.
On the page that opens, the user can specify the Username (mailbox name): for example, if you specify an example in the username, the selected domain will be added automatically after the @ symbol.
Also, the user needs to specify a password and mark the limit on the size of the mailbox in the field E-mail Quota (MB), or remove the limit by putting the appropriate mark next to the Max. In addition, it is necessary to set a limit on the number of sent letters per day in the field Daily Send Limit.
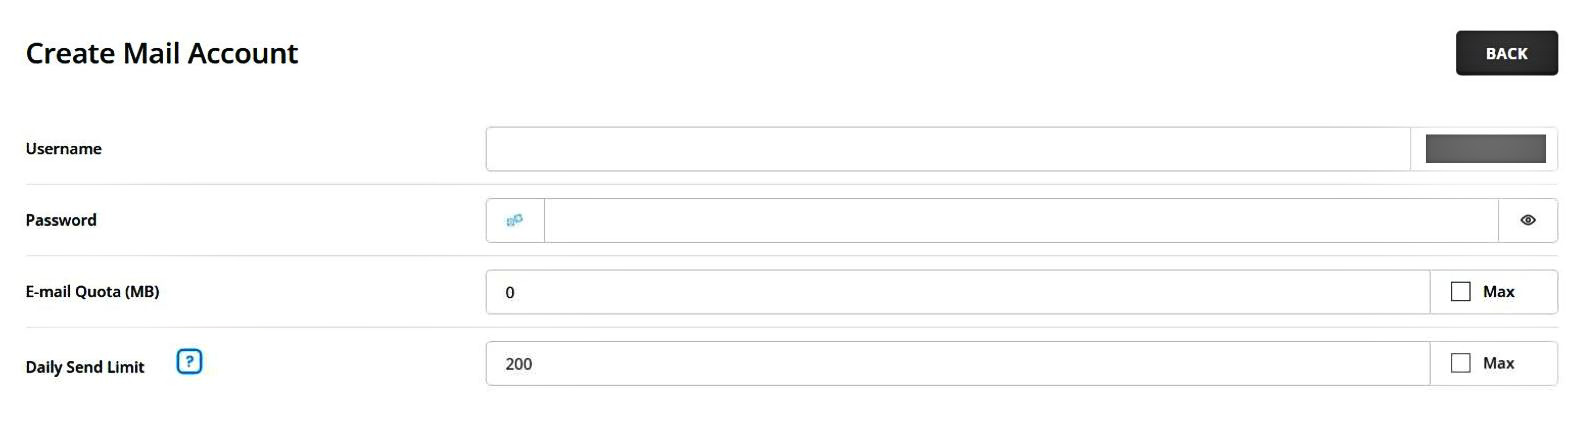
We also recommend using the Enable DKIM (DomainKeys Identified Mail technology) option in the section E-mail Manager --> E-mail Accounts.
To check the statistics of sent and received letters, go to the section Use of E-mail section in the E-mail Management --> E-mail Accounts.
Step 9. Forwarding and filtering settings
The user has the option to configure the forwarding of letters from the mailbox to the desired email address. This function is available in the E-mail Manager --> Forwarders section by clicking the button Create E-mail Forwarder.
It is also possible to configure filters for incoming emails in the section E-mail Manager --> SPAM Filters.
Step 10. Creation of CRON jobs
CRON jobs are created in the section Advanced Features --> CRON Jobs --> button Create CRON Job.
When creating a CRON job, you can specify the period of automatic execution of the task and directly the task or the path to the file (script) that will be executed. Usually, a CRON job consists of a path to a php interpreter and a path to a file (script) to be executed or a separate bash command, for example:
usr/local/php72/bin/php/home/login/domains/domain.ua/public_html/file.php
Step 11. Work with a file manager
The file manager is available in the section System Info & Files --> File Manager, after choosing this section, an interface of the file manager will appear. Site files should usually be placed in the directory domains --> the name of the domain directory --> the directory public_html.
Step 12. Work with logs and statistics
In the section System Info & Files --> Site Summary/Statistics/Logs --> Domain Statistics, user logs of requests to the site and logs of site errors are available to the user. Two sections are available for each of the domains:
- Usage Log is a log of requests to the site.
- Error Log displays errors when executing site scripts.
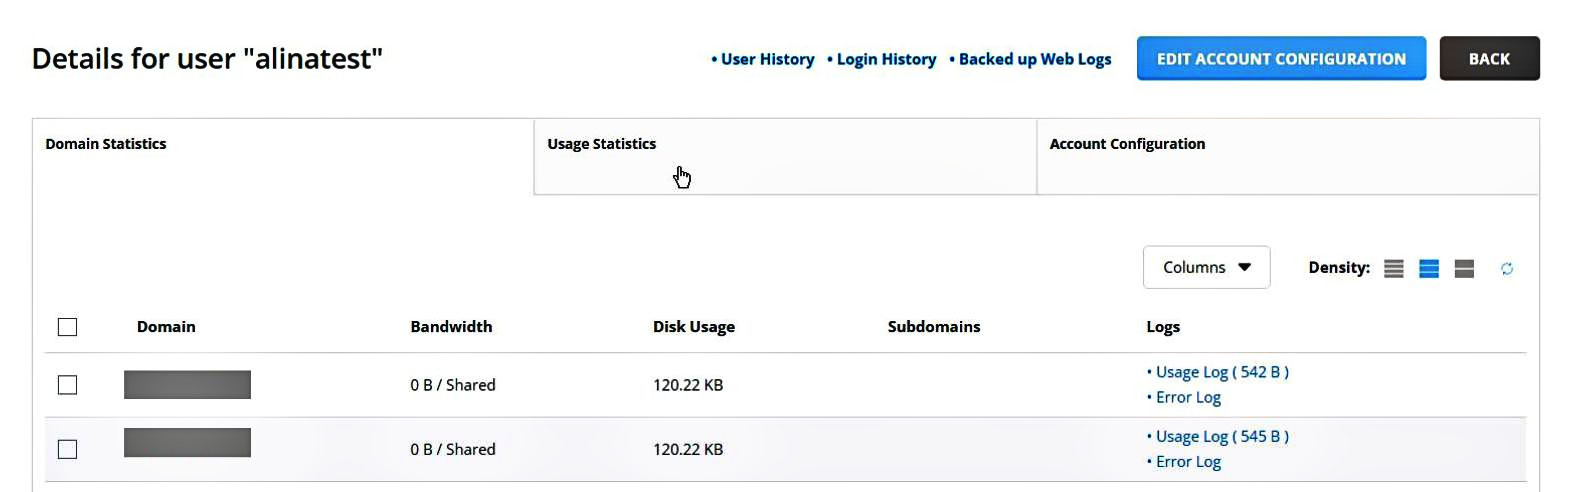
In addition, in the section, there is the tab Usage Statistics which displays general statistics for the created account (traffic, disk usage, number of domains, subdomains, etc.). There is also the tab Account Settings, which contains information about the general settings of the created account in the system (IP address, NS records, and other data that are specified when creating an account in advanced mode through the User Package item).
Step 13. Mail and database management
In the section Extra Features, the user can find the mail management Webmail: Roundcube and the phpMyAdmin database management interface.
To log in to phpMyAdmin, you should use the database username and password that was specified when the database was created as a login.
Step 14. Changing php versions
- This feature is only available to users with administrator rights.
The user can add up to four versions of php with different modes of operation of each of them in the section: Extra Features --> Custom Build --> Edit Options. To do this, you need to be authorized with admin rights in the server control panel.
In the item php*_release, you can select the desired php version, and in the item php*_mode, you can select the operating mode of the selected php version.
By default, the fastcgi operating mode is a connection between Apache web servers on the backend and Nginx on the frontend. This mode is considered the most productive for scripts.
After adding the necessary php versions, you need to go to the item Update Software and click the button Update opposite the item with added new php version settings. After pressing the Update button, the installation of an additional version of php will begin (if it was not previously used on the server). Therefore, the additional version of php may not be available immediately, but after some time, when all the processes of its configuration are completed.
Крок 4. Керування DNS
Користувач може налаштувати домен безпосередньо на повне обслуговування DNS-налаштувань сервером. Для цього потрібно перейти в розділ Керування акаунтом --> Керування DNS.
DNS-записи з типом NS відображають NS-налаштування, які потрібно вказати в панелі Реєстратора доменного імені. Після цього всі наступні дії зі зміною DNS потрібно проводити в розділі Керування акаунтом --> Керування DNS. У цьому розділі можна додавати, змінювати або видаляти DNS-записи.
Якщо планується делегування домену на NS-сервер панелі DirectAdmin, потрібно вказати відповідну адресу NS-сервера у панелі керування доменом (зазвичай адреса NS-сервера вказана у цьому ж розділі Керування акаунтом --> Керування DNS). Після цього всі зміни налаштувань DNS у панелі керування набуватимуть чинності.
Якщо ж домен не делегується на NS-сервер панелі керування DirectAdmin, всі його налаштування так і залишаються в панелі керування доменом на сайті реєстратора, а ті дані, що відображаються у цьому розділі панелі, не впливатимуть на роботу домену.
Крок 5. Встановлення SSL-сертифіката
Встановлення сертифіката здійснюється в розділі Керування акаунтом --> SSL-сертифікати. У верхній частині інтерфейсу панелі в пункті Домен слід вибрати доменне ім’я, для якого потрібно встановити сертифікат.
Якщо потрібно встановити безкоштовний SSL-сертифікат, варто вибрати пункт Отримати автоматичний сертифікат від ACME провайдера. У підрозділі ACME Провайдер рекомендуємо вибрати Let’s Encrypt. Решту налаштувань можна залишити без змін (вони встановлені за замовчуванням), окрім підрозділу Записи сертифікатів — тут є можливість вибрати субдомени, для яких також буде діяти безкоштовний SSL-сертифікат, що випускається.
Також у нижній частині інтерфейсу цієї сторінки можна увімкнути опцію Примусовий SSL із https переадресацією, яка буде автоматично переадресовувати сайт на https-протокол.

Якщо клієнт має власний попередньо згенерований SSL, потрібно натиснути на пункт Вставте попередньо згенеровані сертифікат та ключ і ввести необхідні дані в поля Ключ (RSA) та Сертифікат (зазвичай це ланцюжок із вмісту файлів .crt + ca.bundle).

Крок 6. Створення додаткових FTP-акаунтів
Для створення додаткових FTP-акаунтів у розділі Керування акаунтом потрібно вибрати пункт Керування FTP та натиснути кнопку Створити FTP акаунт. На сторінці, яка відкрилася, вказуємо Ім’я користувача FTP і Пароль (є можливість одразу згенерувати випадковий пароль).
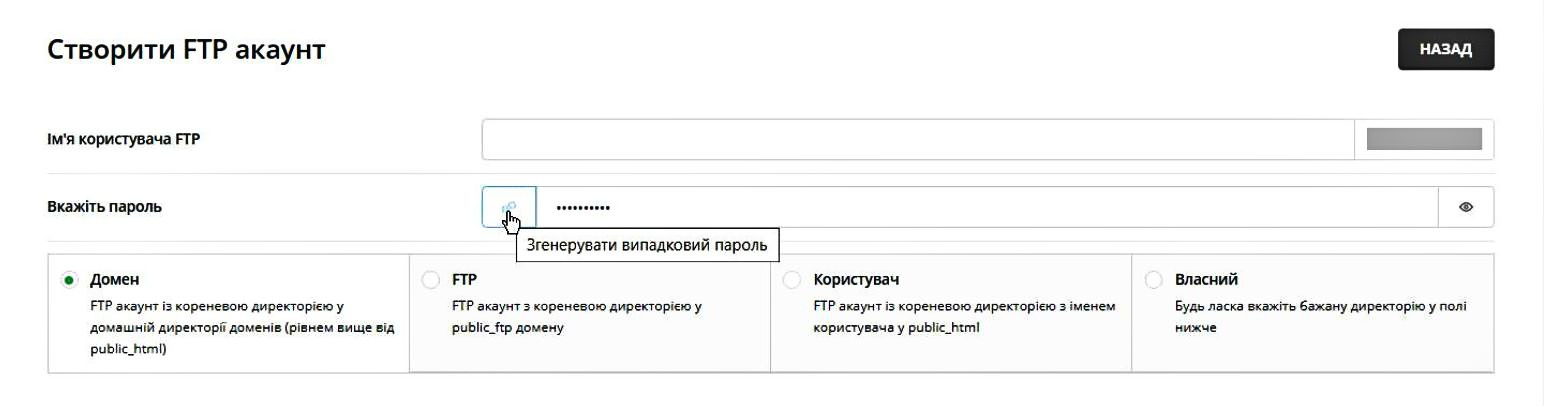
При створенні FTP акаунту користувачу надається вибір домашньої директорії для FTP акаунту:
- Домен — це FTP акаунт із кореневою директорією у домашній директорії доменів (рівнем вище від public_html).
- FTP — це FTP акаунт з кореневою директорією у public_ftp домену.
- Користувач — це FTP акаунт із кореневою директорією з іменем користувача у public_html.
- Власний — це FTP акаунт з бажаною домашньою директорією.
Якщо потрібен FTP доступ до всіх файлів облікового запису, рекомендуємо вибрати пункт Власний, залишити за замовчуванням рядок Директорія та натиснути кнопку Створити.
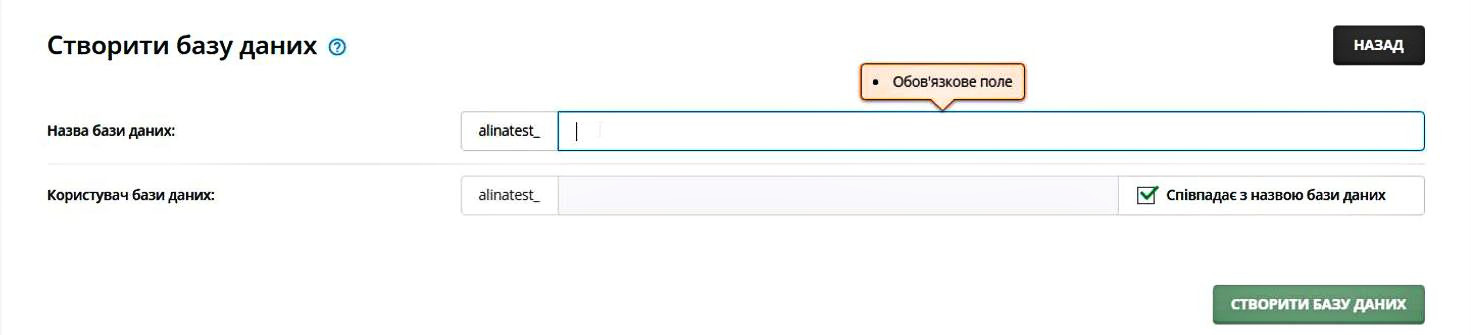
Крок 7. Додавання бази даних
Користувач може додати базу даних, яку використовуватиме сайт чи декілька сайтів або баз даних для кожного окремого сайту.
Додавання бази даних здійснюється в розділі Керування акаунтом --> Керування MySQL --> кнопка Створити базу даних. Відкриється сторінка створення бази даних, де необхідно вказати Назву бази даних та Користувача бази даних. За замовчуванням назва бази даних та ім’я користувача аналогічні завдяки активній опції Співпадає з назвою бази даних.
Префікс бази даних та префікс користувача обов’язкові — це ім’я (логін) користувача та нижнє підкреслювання.
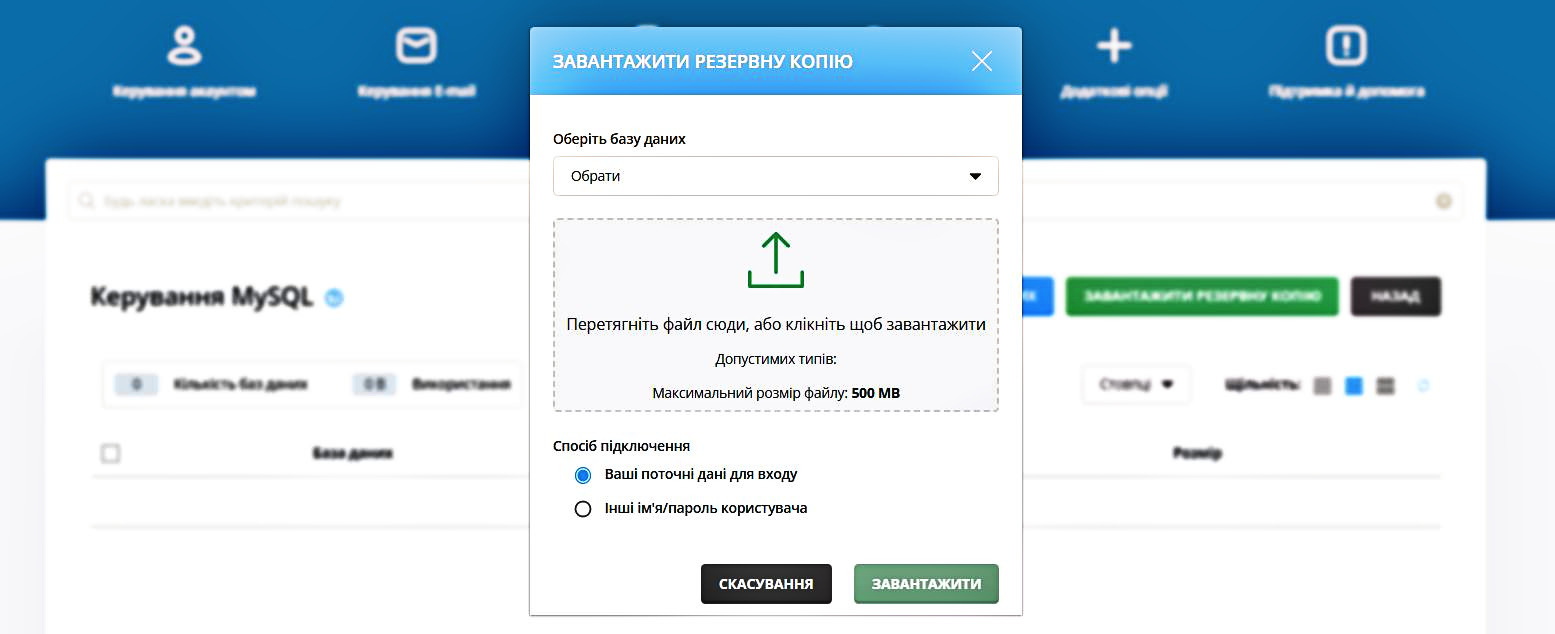
Якщо потрібно завантажити існуючий дамп .sql до певної бази даних, в розділі Керування акаунтом --> Керування MySQL варто натиснути кнопку Завантажити резервну копію, далі Обрати базу даних та перетягнути потрібний файл у відповідне поле для завантаження.
Крок 8. Додавання поштових скриньок
Функція додавання поштових скриньок доступна в розділі Керування E-mail --> E-mail акаунти.
За замовчуванням для кожного домену створено поштову скриньку, її видаляти необов’язково. Для додавання нової поштової скриньки потрібно у верхній частині інтерфейсу панелі в пункті Домен вибрати потрібне доменне ім’я та натиснути на кнопку Створити акаунт.
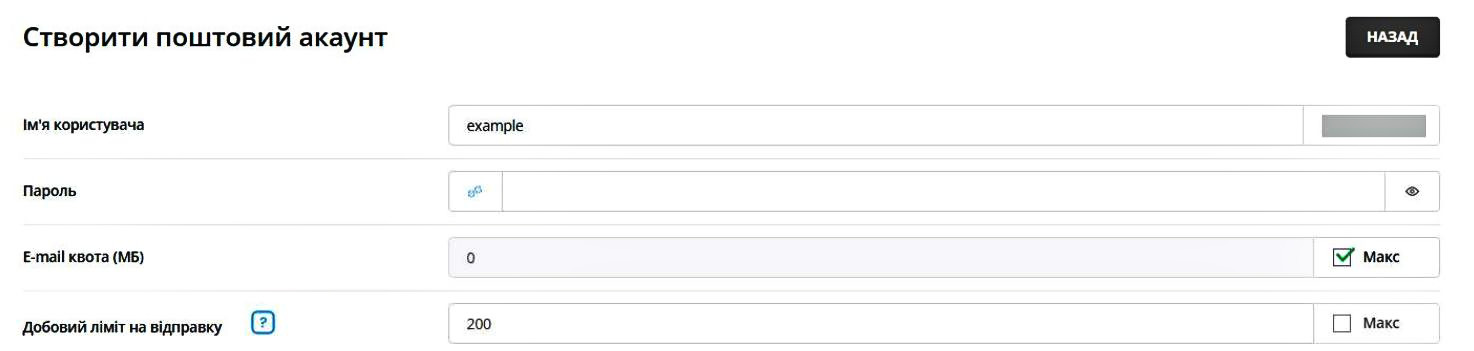
На сторінці, яка відкрилася, користувач може вказати Ім’я користувача (ім’я поштової скриньки): наприклад, якщо вказати example в імені користувача — вибраний домен буде доданий автоматично після символу @.
Також користувачу потрібно вказати пароль і позначити ліміт на розмір поштової скриньки в полі E-mail квота (МБ) або ж прибрати ліміт, поставивши відповідну позначку біля пункту Макс. Крім цього, необхідно встановити ліміт на кількість надісланих листів на добу в полі Добовий ліміт на відправку.
Також рекомендуємо в розділі Керування E-mail --> E-mail акаунти використати опцію Увімкнути DKIM (технологію DomainKeys Identified Mail).
Перевірити статистику за надісланими та отриманими листами допоможе розділ пункт Використання E-mail у розділі Керування E-mail --> E-mail акаунти.
Крок 9. Налаштування переадресації та фільтрації
У користувача є можливість налаштувати переадресацію листів з поштової скриньки на потрібну email-адресу. Ця функція доступна в розділі Керування E-mail --> Переадресації за кнопкою Створити e-mail переадресацію.
Також є можливість налаштувати фільтри для вхідних листів у розділі Керування E-mail --> SPAM фільтри.
Крок 10. Створення CRON-завдань
Створення CRON-завдань здійснюється в розділі Розширені налаштування --> CRON-завдання --> кнопка Створити CRON-завдання.
При створенні CRON-завдання можна вказати період автоматичного виконання завдання та безпосередньо завдання або шлях до файлу (скрипту), що буде виконуватись. Зазвичай CRON-завдання складається зі шляху до php-інтерпретатора та шляху до файлу (скрипту), що виконується, або окремої bash команди, наприклад:
usr/local/php72/bin/php/home/login/domains/domain.ua/public_html/file.php
Крок 11. Робота з файловим менеджером
Файловий менеджер доступний в розділі Інформація про систему та файли --> Файловий менеджер, після вибору якого виконується перехід в інтерфейс файлового менеджера. Файли сайту зазвичай потрібно розташовувати у каталозі domains --> ім’я каталогу домена --> каталог public_html.
Крок 12. Робота з журналами та статистикою
У розділі Інформація про систему та файли --> Звіт по сайту/Статистика/Журнали --> Статистика домену користувачу доступні логи запитів до сайту та логи помилок сайту. Для кожного з доменів доступно два розділи:
- Журнал використання — це лог запитів до сайту.
- Журнал помилок, в якому відображаються помилки при виконанні скриптів сайту.
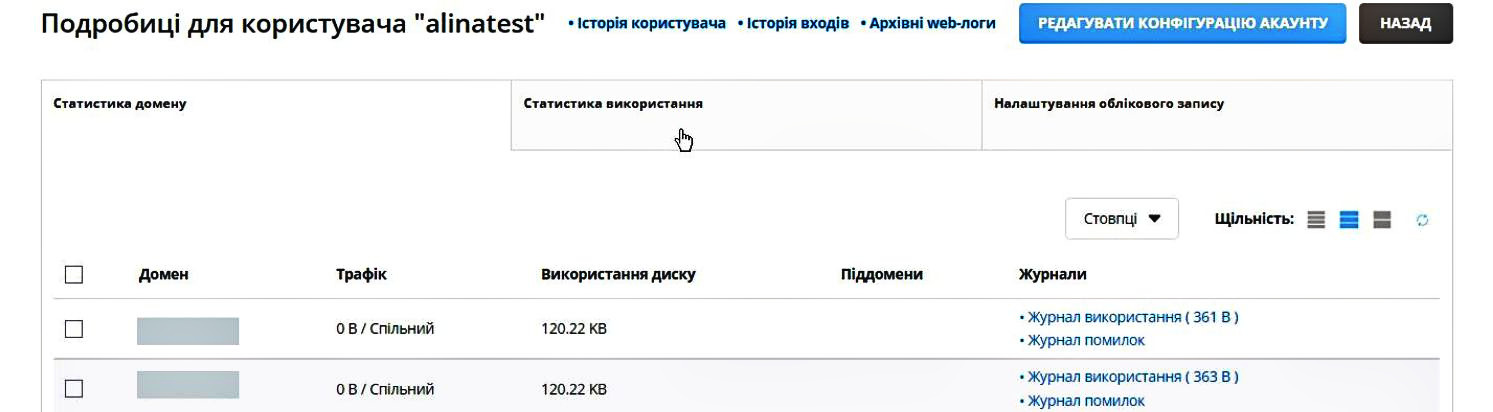
Окрім цього, в розділі доступна вкладка Статистика використання, яка відображає загальну статистику за створеним обліковим записом (трафік, використання диска, кількість доменів, субдоменів тощо). Також є вкладка Налаштування облікового запису, де міститься інформація про загальні налаштування створеного облікового запису в системі (IP-адреса, NS-записи та інші дані, які задаються при створенні облікового запису в розширеному режимі через пункт Налаштування тарифу).
Крок 13. Керування листами та базами даних
У розділі Додаткові опції користувачу доступні вебклієнт керування листами Вебмейл: Roundcube та інтерфейс управління базами даних phpMyAdmin.
Для авторизації в phpMyAdmin в якості логіна слід використовувати ім’я користувача бази даних та пароль, який був вказаний при створенні бази даних.
Крок 14. Зміна php-версій
- Функція доступна лише користувачам з правами адміністратора
Користувач може додати до чотирьох версій php з різними режимами роботи кожної з них у розділі: Додаткові опції --> Custom Build --> Edit Options. Для цього потрібно бути авторизованим з правами admin в панелі керування сервером.
В пункті php*_release можна вибрати потрібну версію php, а в пункті php*_mode — режим роботи вибраної версії php.
За замовчуванням вказано режим роботи fastcgi — це зв’язка вебсерверів Apache на бекенді та Nginx на фронтенді. Цей режим вважається найпродуктивнішим для роботи скриптів.
Після додавання потрібних версій php необхідно перейти в пункт Update Software та натиснути кнопку Update навпроти пункту з доданими новими налаштуваннями версій php. Після натискання кнопки Update розпочнеться встановлення додаткової версії php (якщо раніше вона не використовувалась на сервері). Тому додаткова версія php може бути доступна не одразу, а через деякий час, коли завершаться всі процеси з її налаштування.
Getting to grips with the DirectAdmin web hosting control panel is easy, especially with our step-by-step instructions. By the way, this entire algorithm of actions is also suitable for users of email hosting. The functionality of the control panel is the same for users working on a dedicated server and for users of shared hosting. Check it out and use it!
And if you need specific help with the panel from our technical support service specialists, contact us at any time. We are always happy to help!


