First steps in clouds: Guideline for working on a virtual server
- Home
- Blog
- Technical Support
- First steps in clouds: Guideline for working on a virtual server
What should I do immediately after purchasing a cloud? Where can I get access details, how to connect to a virtual server, and transfer the necessary programs and data? These and other similar questions may arise if you have ordered a virtual machine for the first time, and you start working in the cloud. To figure things out, we have prepared a step-by-step visual guide on what to do immediately after ordering a virtual machine based on our services TuchaFlex+ or TuchaBit.
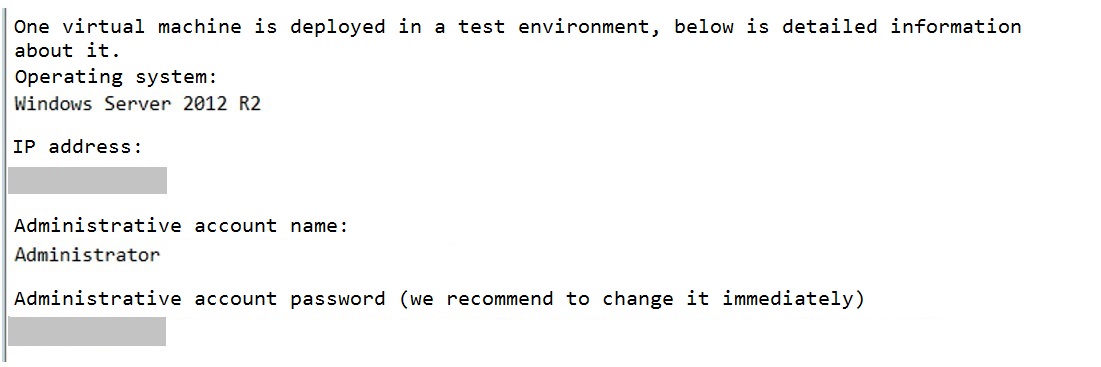
After ordering the virtual server, you will receive an email from us stating that the virtual machine has been deployed for you. The email will also contain the access details to the virtual machine and a server control panel.
Note that the control panel guideline is applicable for both Windows-based and Linux-based virtual machines. However, a virtual server operation description is applicable only for Windows-based servers. In the future, we will prepare a separate article on working with a virtual machine on Linux.
To access the virtual server, in the email, you will receive the following parameters:
- operating system that is already installed on the server;
- virtual server IP address;
- administrative account name;
- administrative account password, which we recommend changing it immediately after logging in (we will show you how to do this later).
The email will also contain the following access details to the server control panel:
- control panel address;
- administrative account name;
- administrative account password (we strongly recommend changing it as soon as possible);
- domain.
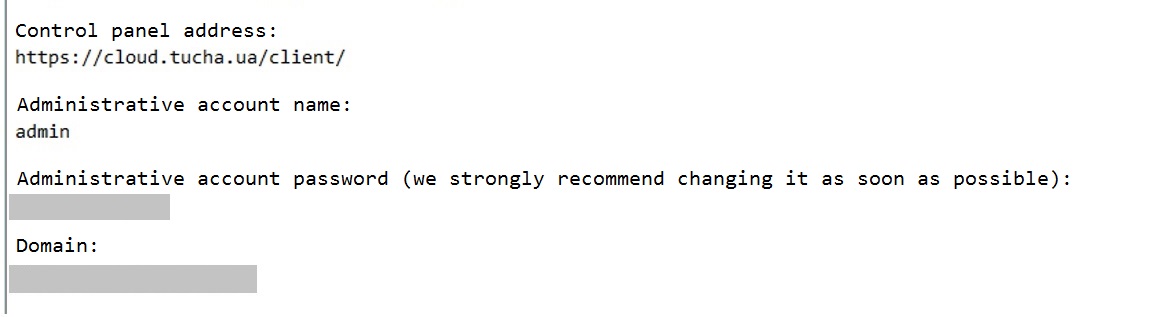
You will need these details if you need to make a quick interference in the virtual machine's operation in the future, for example, to reinstall the operating system.
We recommend saving emails from our technical support team, including the letter with the access details, during the entire period of cooperation with Tucha. And our team will do everything possible to ensure that our cooperation is long and handy for you.
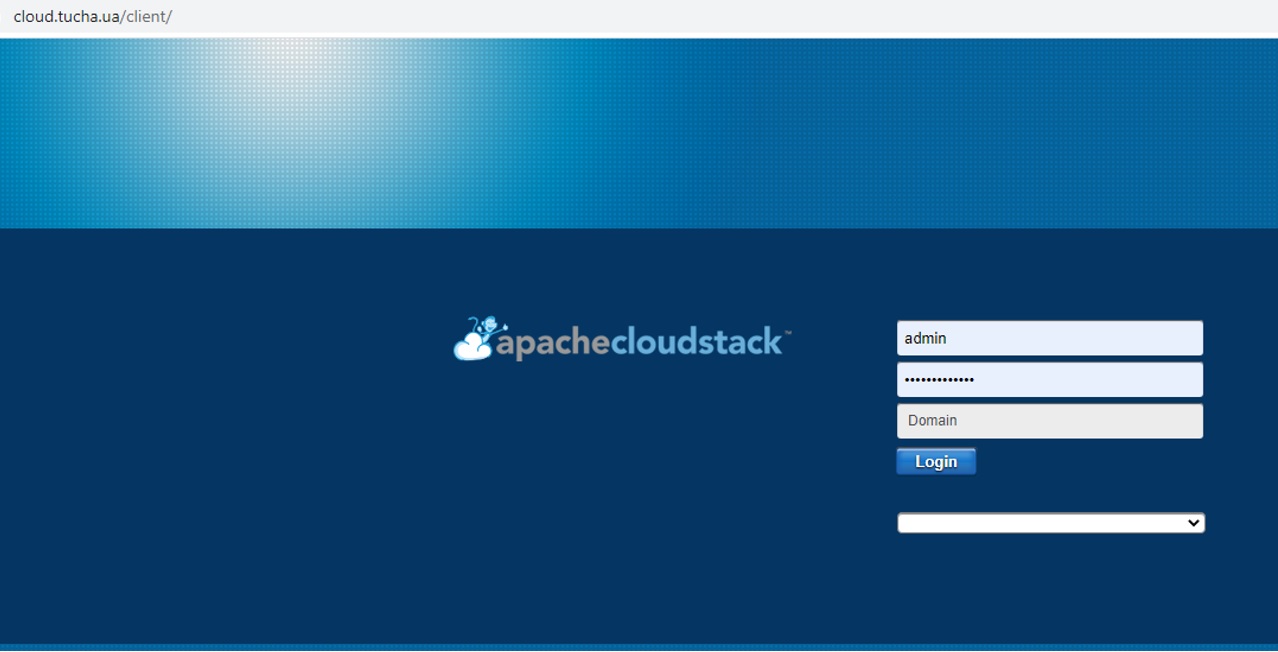
First, let us look at what functions are available for working with the virtual machine in the server control panel. To do this, click on the link that is specified in the email as Control Panel Address: https://cloud.tucha.ua/client. Log in to the system using the received details, type the name, and password of the administrative account and the domain. Click Login and the main menu of the virtual server control panel will open.
So, to view the current functions for managing the virtual machine, go to the Instances. Here we select the virtual machine (if there are several deployed ones) with which you want to perform any manipulations. All available functions for working with this virtual machine are shown in the icons at the top of the screen. Let us look at them in more detail:
1. Virtual machine stop function, which applies only in case of emergency.
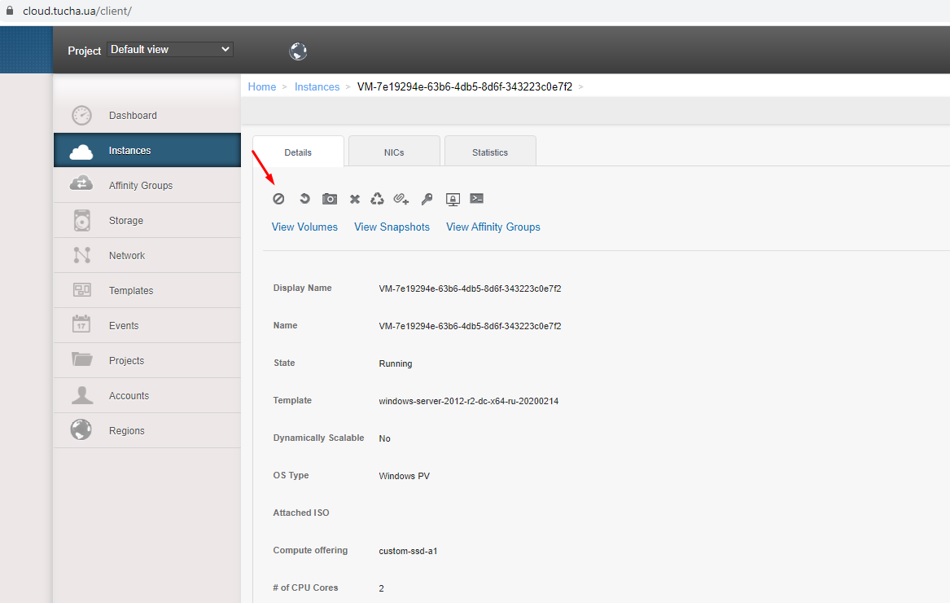
We strongly recommend not abusing this button, but only use it when it is not possible to stop the virtual machine in the correct way (which we will discuss later) or if you need to stop the system right now. In all other cases, we recommend shutting down the virtual machine using the Start menu.
2. Button for restarting the virtual machine.

3. Button for reinstalling OS on the virtual machine.
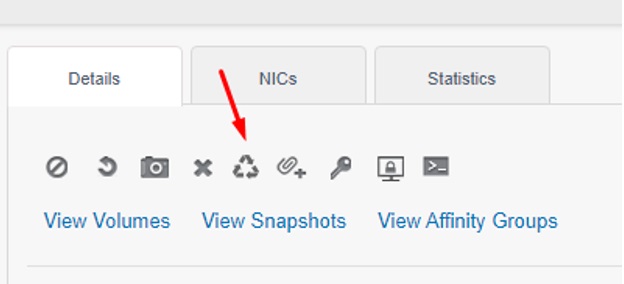
4. Button for connecting CDs to the virtual server.
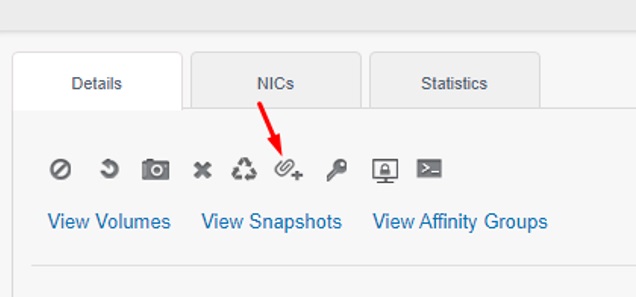
5. Full password reset button.
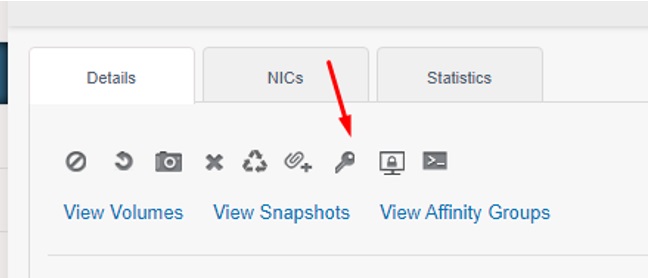
Note that this feature is only available when the virtual machine is shut down.
6. SSH key pair reset button.
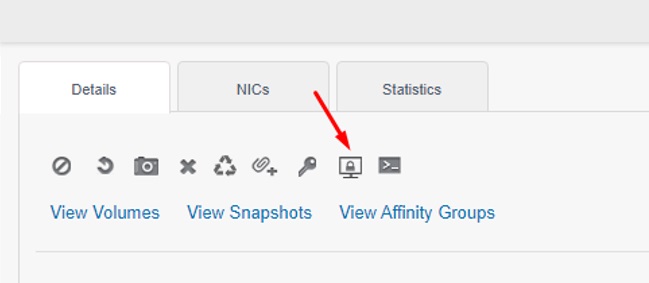
7. Access to the virtual machine management console.
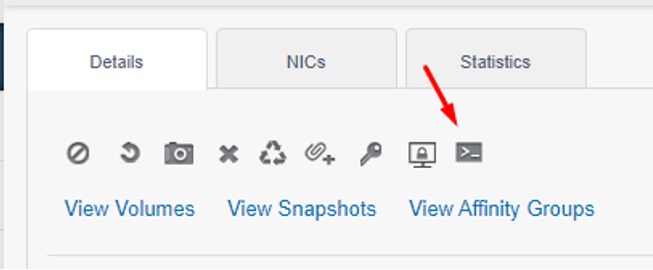
After logging in, you can connect to the virtual machine via RDP Protocol, even if you do not have access to it.
To exit the server control panel, click on the user name in the upper-right corner and select Logout in the menu that appears.
For all clients who use the virtual servers based on TuchaFlex+ and TuchaBit services, we regularly create full snapshots of their virtual machines’ disks. The cost of creating and storing the last two snapshots is already included in the cost of the virtual server rent. In a separate article, we wrote about the importance of snapshots and how they are made.
If you need to create a disk snapshot manually, you can do it in the following manner. In the View Volumes tab, which is located below right after the available functions for managing the virtual machine, click on the desired disk, and then click on the Take Snapshot button. Done! Please note that full snapshots for the main or ROOT disk and additional disks are created separately.
Now let us connect directly to the virtual machine. To do this, right-click on the Start menu on the desktop and select Run. In the line, enter the command mstsc, which will open the program for connecting to a remote desktop, and click OK.
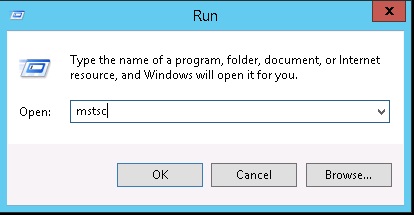
That is it, the interface of this program is in front of us.
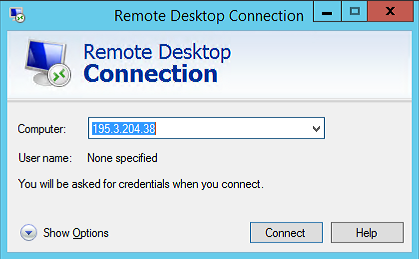
Now enter the computer name, the IP address specified in the email with the access details:
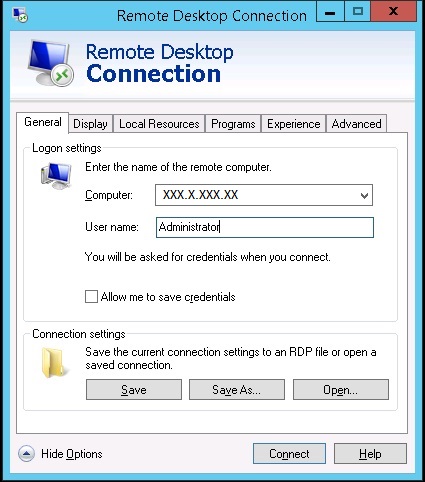
Next, click the Show Options button and enter the administrative name account in the User name section. This information you can also find in the email.
Also, in the Local Resources tab, you can additionally enable:
- clipboard that will work between the local machine and the virtual server,
- local machine drive redirection;
- port forwarding;
- printing redirection from the local printer to the virtual server (this procedure will be considered later).
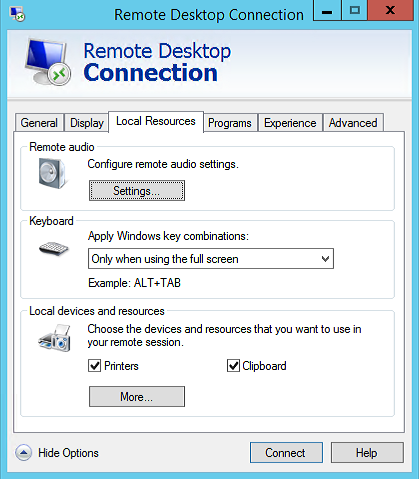
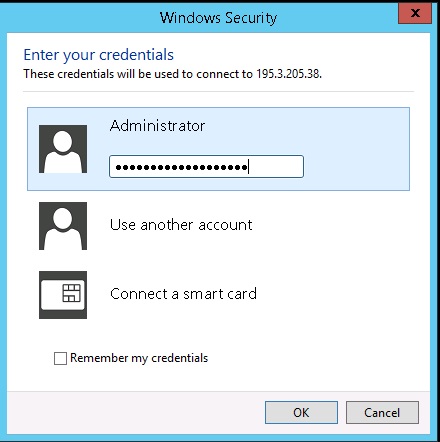
After we have entered the computer name and the administrative account name and selected the necessary options in the Local Resources section, click Connect. Enter the administrative account password (you can find it in the access details) and click OK.
You do not have to re-enter your credentials every time you connect. To connect to the server in seconds, we recommend creating a shortcut and saving it on your desktop. To do this, in the Connection settings section, click Save as.
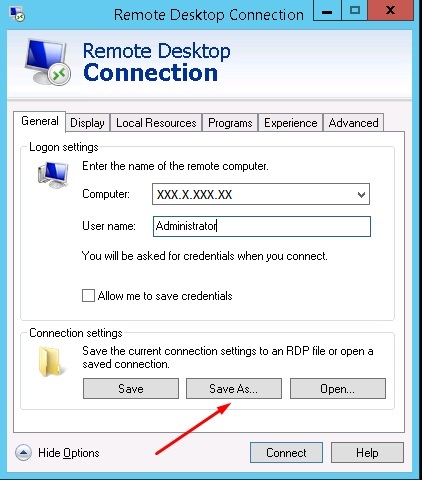
Next, select the directory where you want to save the shortcut, set a new name for it (if necessary), and click Save. After that, the shortcut for a quick connection to the remote server will appear on the desktop.
The first thing that you need to do immediately after the first login to the server is to change the password of the administrative account. Let us see how to do it.
To set a new password for logging in, press the keyboard shortcut Ctrl+Alt+End. In the menu that appears, select Change password. Enter the old password that was specified in the email with the access details, then enter the new password and confirm it. Then click on the Send arrow.
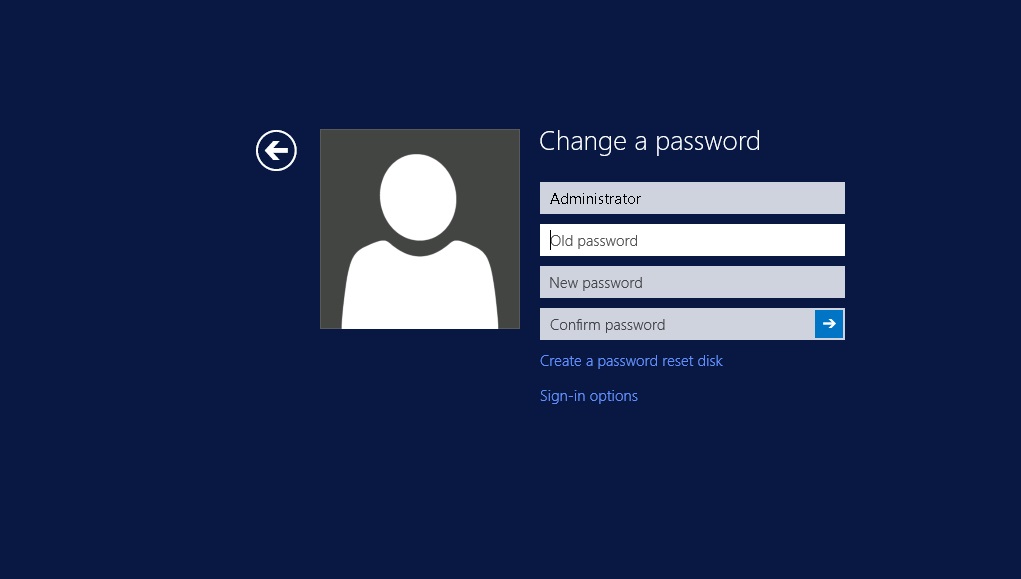
Here we go, the password is changed.
Важливо зазначити: адміністративний доступ потрібен лише для використання адміністративних операцій. Решту задач на віртуальному сервері є сенс виконувати від імені користувача, який адміністративних прав не має.
Отже, для того щоб у версіях Windows Server 2012 R2, 2016, 2019, 2022 створити нового користувача без адміністративних прав та додати його до групи користувачів віддаленого робочого стола, виконуємо декілька нескладних кроків:
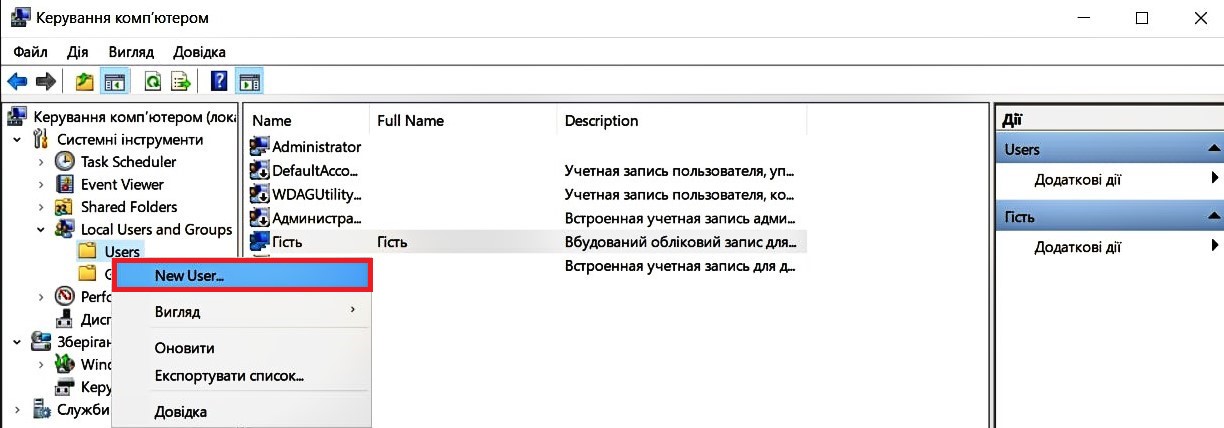
1. Натискаємо правою кнопкою миші на меню Пуск (Start) і вибираємо Керування комп'ютером (Computer Management).
2. У вікні, що відкрилось, вибираємо вкладку Службові програми (System Tools) > Локальні користувачі (Local Users and Groups).
3. Натискаємо правою кнопкою миші на Користувачі (Users) і вибираємо пункт Новий користувач (New User).
4. Заповнюємо поля у верхній частині вікна створення користувача:
- Користувач (User name) — ім'я, яке буде використовуватися для входу в систему.
- Повне ім'я (Full name) — ім'я, яке буде відображатися на екрані вітання.
- Опис (Description) — опис облікового запису.
5. Задаємо та підтверджуємо пароль. Не забуваємо про вимоги складності.
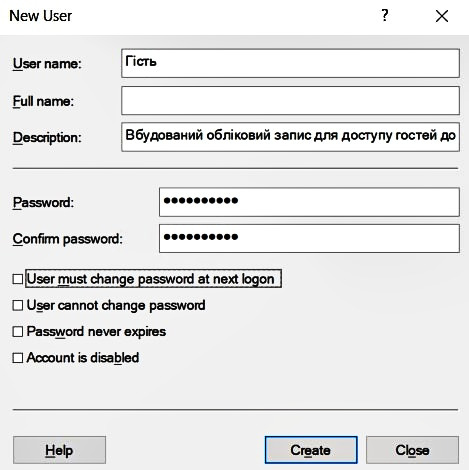
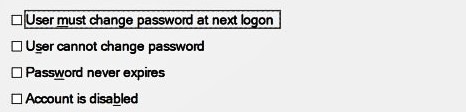
6. Якщо потрібно, активуємо або скасовуємо наступні функції:
- Вимагати зміни пароля при наступному вході в систему (User must change password at next logon). Цей пункт вибраний за умовчанням. Скасовуємо його, якщо бажаємо залишити вказаний тільки що пароль. В іншому випадку користувачеві доведеться змінити пароль при першому вході в систему.
- Заборонити зміну пароля користувачем (User can not change password). Тут все теж зрозуміло з назви: не хочемо, щоб користувач сам змінював пароль, — активуємо.
- Термін дії пароля не обмежений (Password never expires). Якщо є потреба в періодичній зміні паролів — вмикаємо цю функцію.
- Відключити обліковий запис (Account is disabled). Якщо активувати цю функцію, користувач не зможе входити в систему. Залишаємо як є.
7. Натискаємо Створити (Create).
8. Тепер можемо знайти нового користувача у вкладці Користувачі (Users). Щоб змінити ті чи інші налаштування, достатньо клікнути на ім'я правою кнопкою миші та вибрати пункт Властивості (Properties).
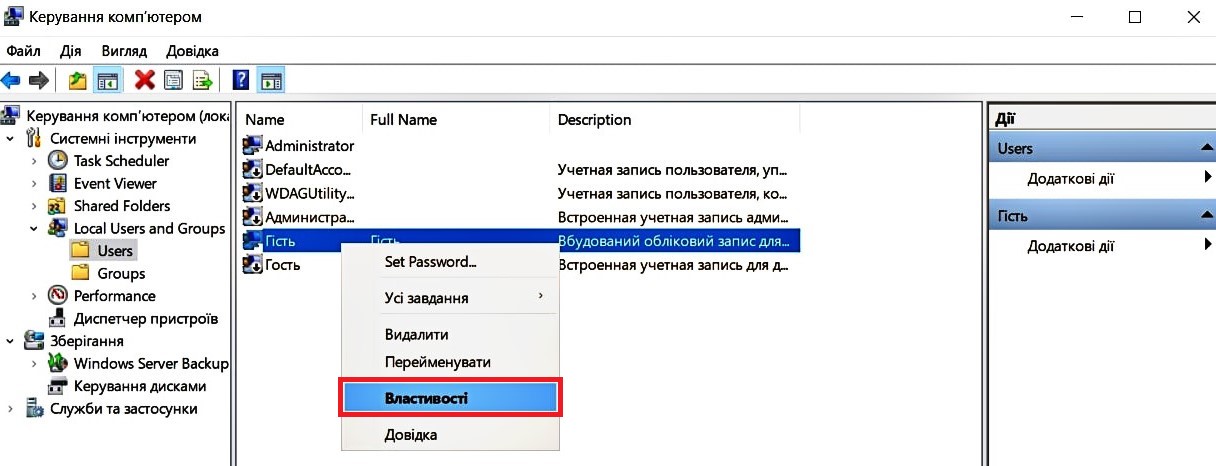
9. У вікні властивостей вибираємо потрібні налаштування та не забуваємо підтверджувати їх, натискаючи ОК і Застосувати у всіх відкритих вікнах.
10. Щоб користувач міг підключатися до віддаленого робочого столу, відкриваємо вкладку Членство в групах.
11. Натискаємо Додати (Add) > Додатково (Advanced) > Пошук (Find Now).
12. Знаходимо групу Користувачі віддаленого робочого столу та натискаємо ОК.
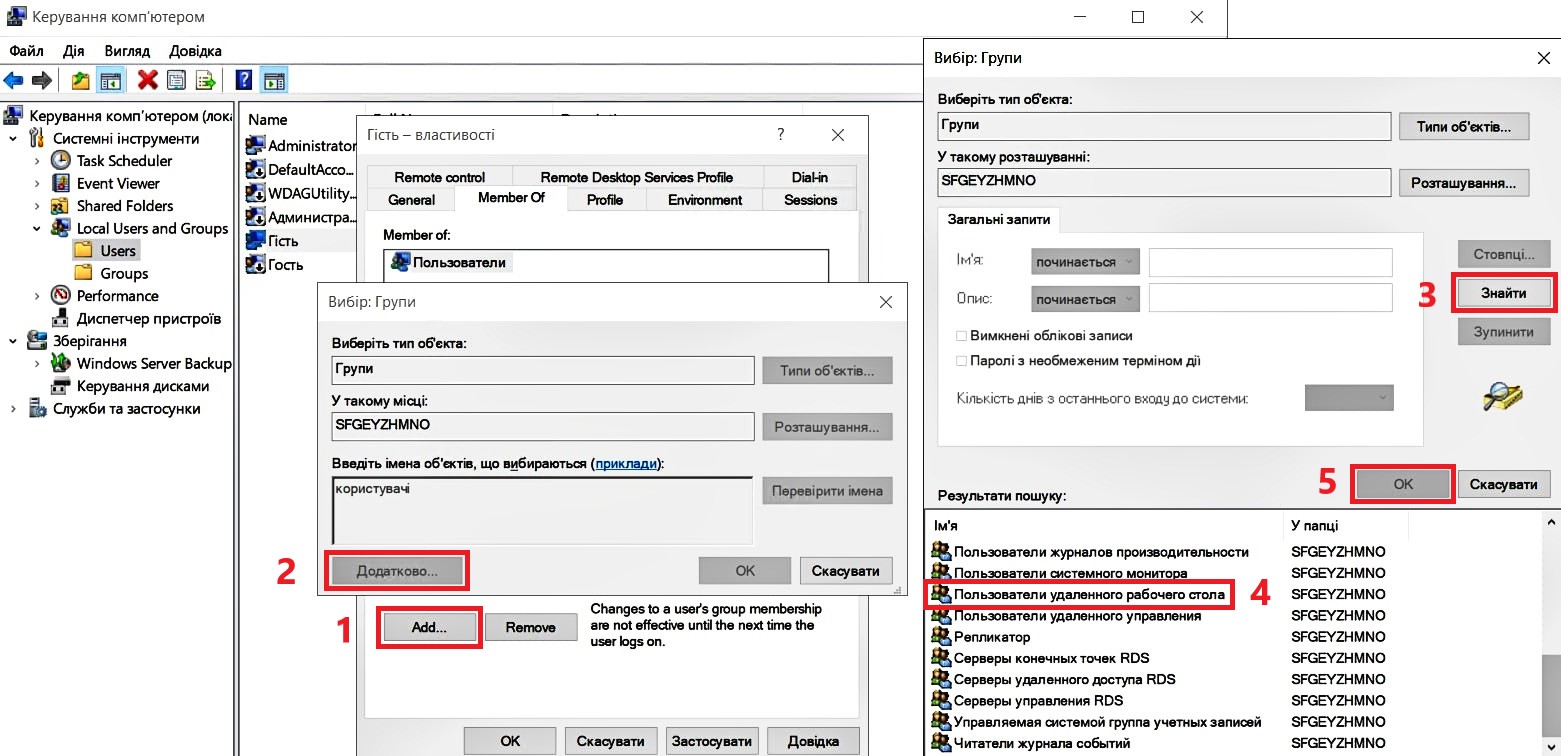
13. У всіх відкритих вікнах натискаємо ОК, а в останньому — Застосувати.
Дивіться також детальну відеоінструкцію на YouTube-каналі.
The next step is to check the system updates. To do this, right-click on the Start menu, select Control Panel, and then Windows Update.
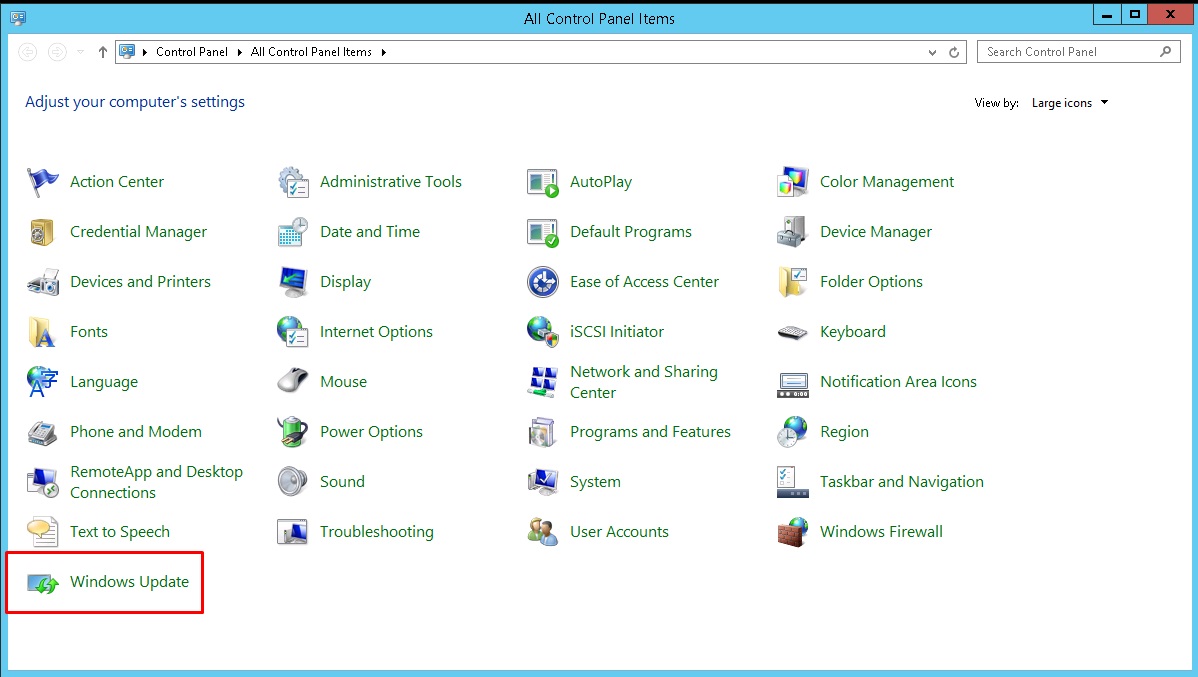
Click the Check for updates button, and then the system will start searching for the operating system updates.
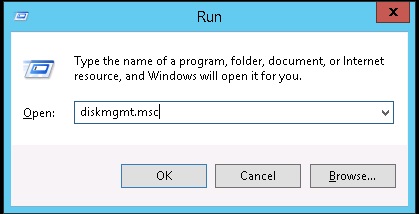
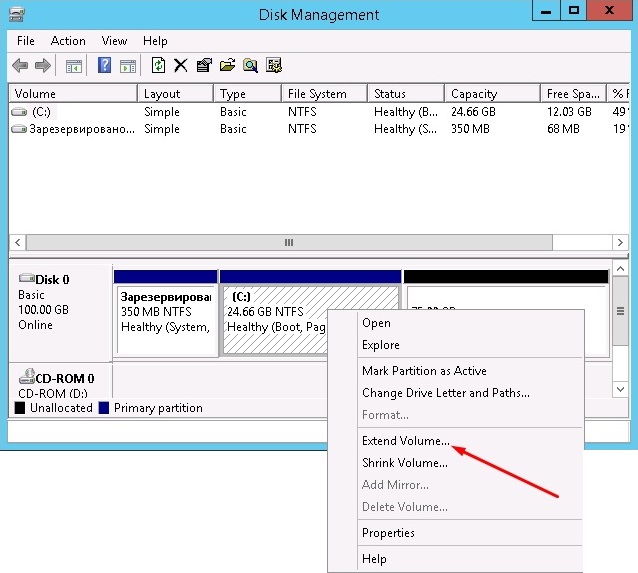
And finally, mark up the disk during the first connect to the server. To do this, right-click on the Start menu and select Run. In the command line, enter diskmgmt.msc.
In this example, you can see that the server has 75 GB of the unmarked available space. The capacity of the partition C is almost 25 GB.
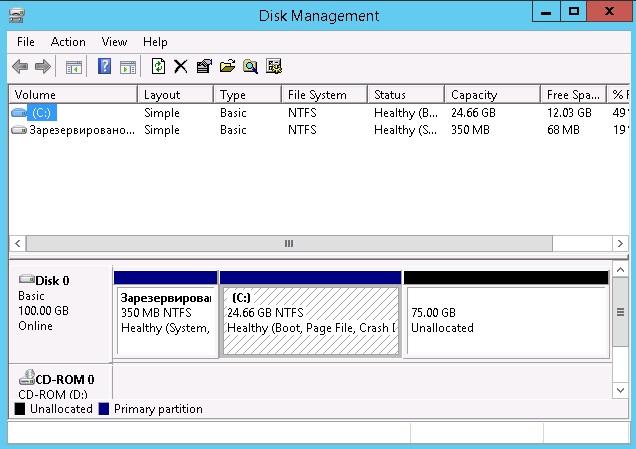
There are two ways to manage the unmarked space. The first option is to add it to the partition C (partially or completely). To do this, right-click on the disk and select Extend Volume. Next, follow the instructions of the volume extension wizard, select the disk size that you want to add to this partition, and click Done.
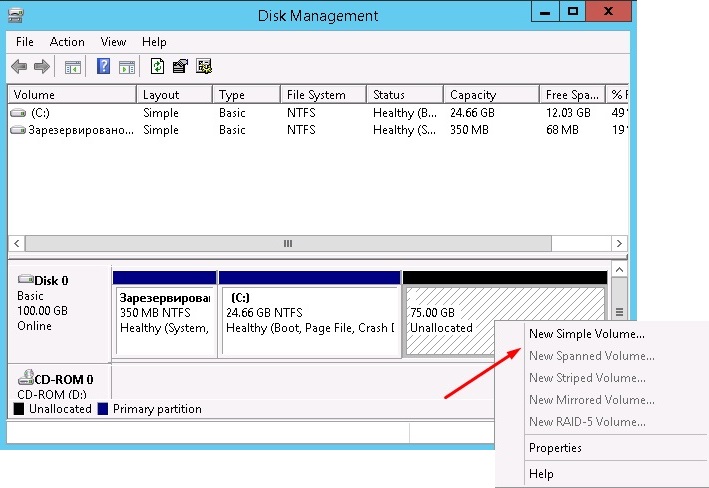
The second option is to create an additional partition for storing data from the unmarked space. To do this, right-click on it, select New Simple Volume and follow the instructions of the volume extension wizard to create the additional partition.
The next step we recommend is to set up printing from the local printer to the remote server. We want to note that you do not need to perform these actions if up to two users work on the server, or if you don't need to redirect printing from the local printer to the remote server. However, if more than two users work on the server or you cannot do without printing, we recommend adding roles and features immediately, which we will discuss below.
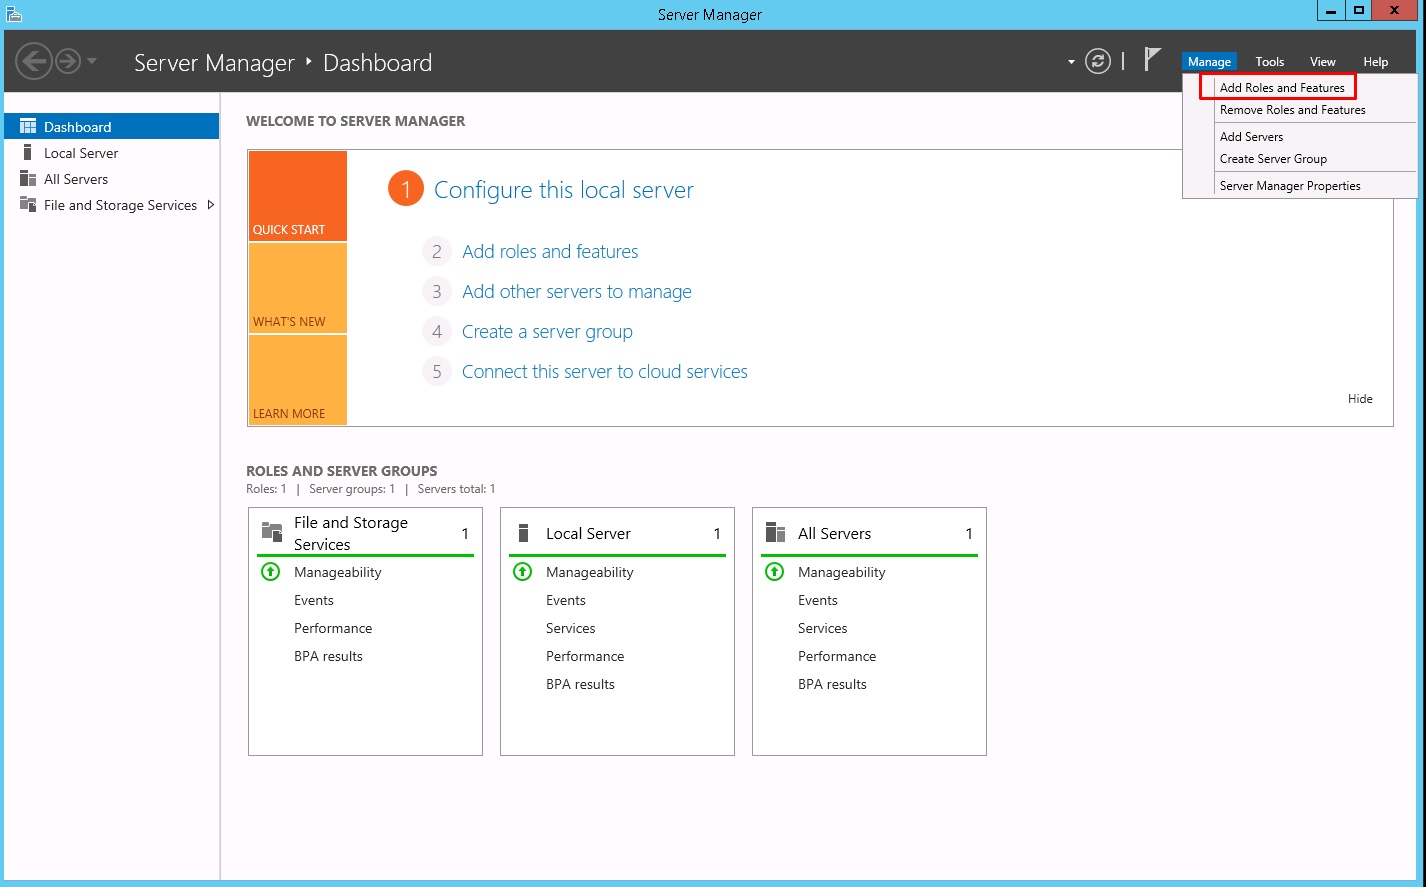
So, to redirect printing from the local printer to the virtual server, you need to install a remote desktop server and its services in the system. On the taskbar, select Server Manager. In the upper-right corner, click Manage and select Add Roles and Features.
In the Server Roles section, tick the box next to Remote Desktop Services and click Next.
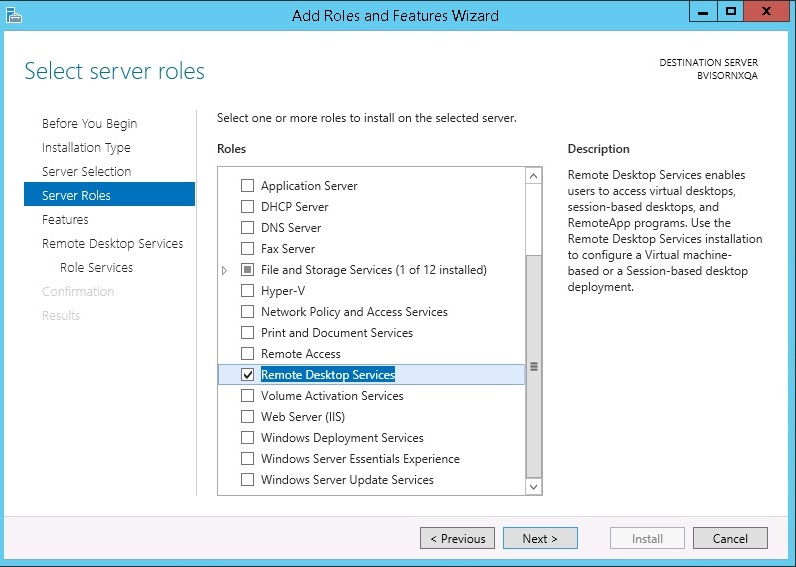
Now the Role Services section appeared on the screen, select Remote Desktop Licensing and Remote Desktop Session Host.
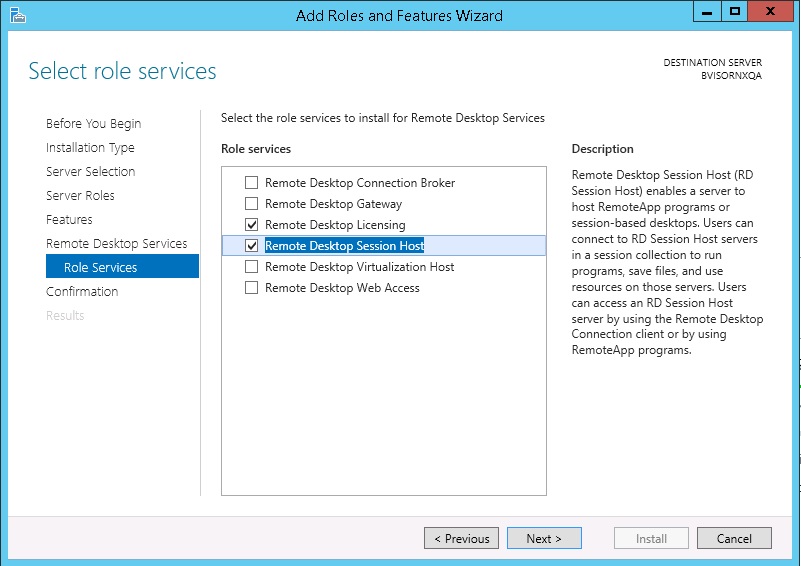
Click Next and Install to apply the selected roles and features.
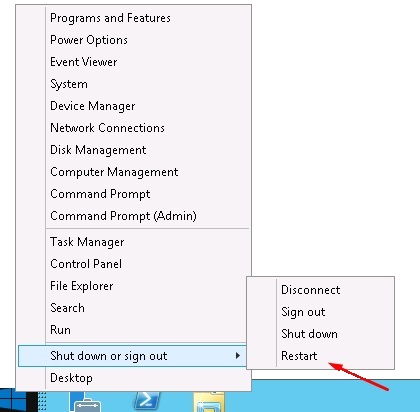
After installation, the system will ask you to restart. Perform it by right-clicking on the Start menu. Select Shut down or sign out and then Restart. Done!
By default, Remote Desktop Services have a free trial period of 119 days. During this time, they will not request licenses. However, after the expiration date, you will need to decide on purchasing licenses for each user to connect to the remote desktop. Let us recall that without them, no more than two users can work on the server at the same time, and the ability to print on the local printer from the virtual machine will not be available. If you decide to purchase licenses in the future, we can provide them to you and help you install licenses on the virtual server.
It is quite easy to copy any file or shortcut from the local machine to the cloud server and vice versa. To do this, right-click on the document or shortcut that you need to copy and select Copy. Then open the virtual server (or local machine), right-click on the empty field on the desktop, and select Paste. That is it, the necessary information is copied to the virtual server or local machine.
The algorithm for installing programs on the virtual machine does not differ from the same procedure on the local computer. You can install all the necessary programs and data for the entire office and individual services on the virtual server. For example:
- e-document management system;
- accounting and financial accounting programs;
- project management system;
- CRM and ERP systems;
- other specialized applications;
- corporate email;
- IP-telephony;
- documents, archives, etc.
This is how might look like a desktop on the virtual server on which an:
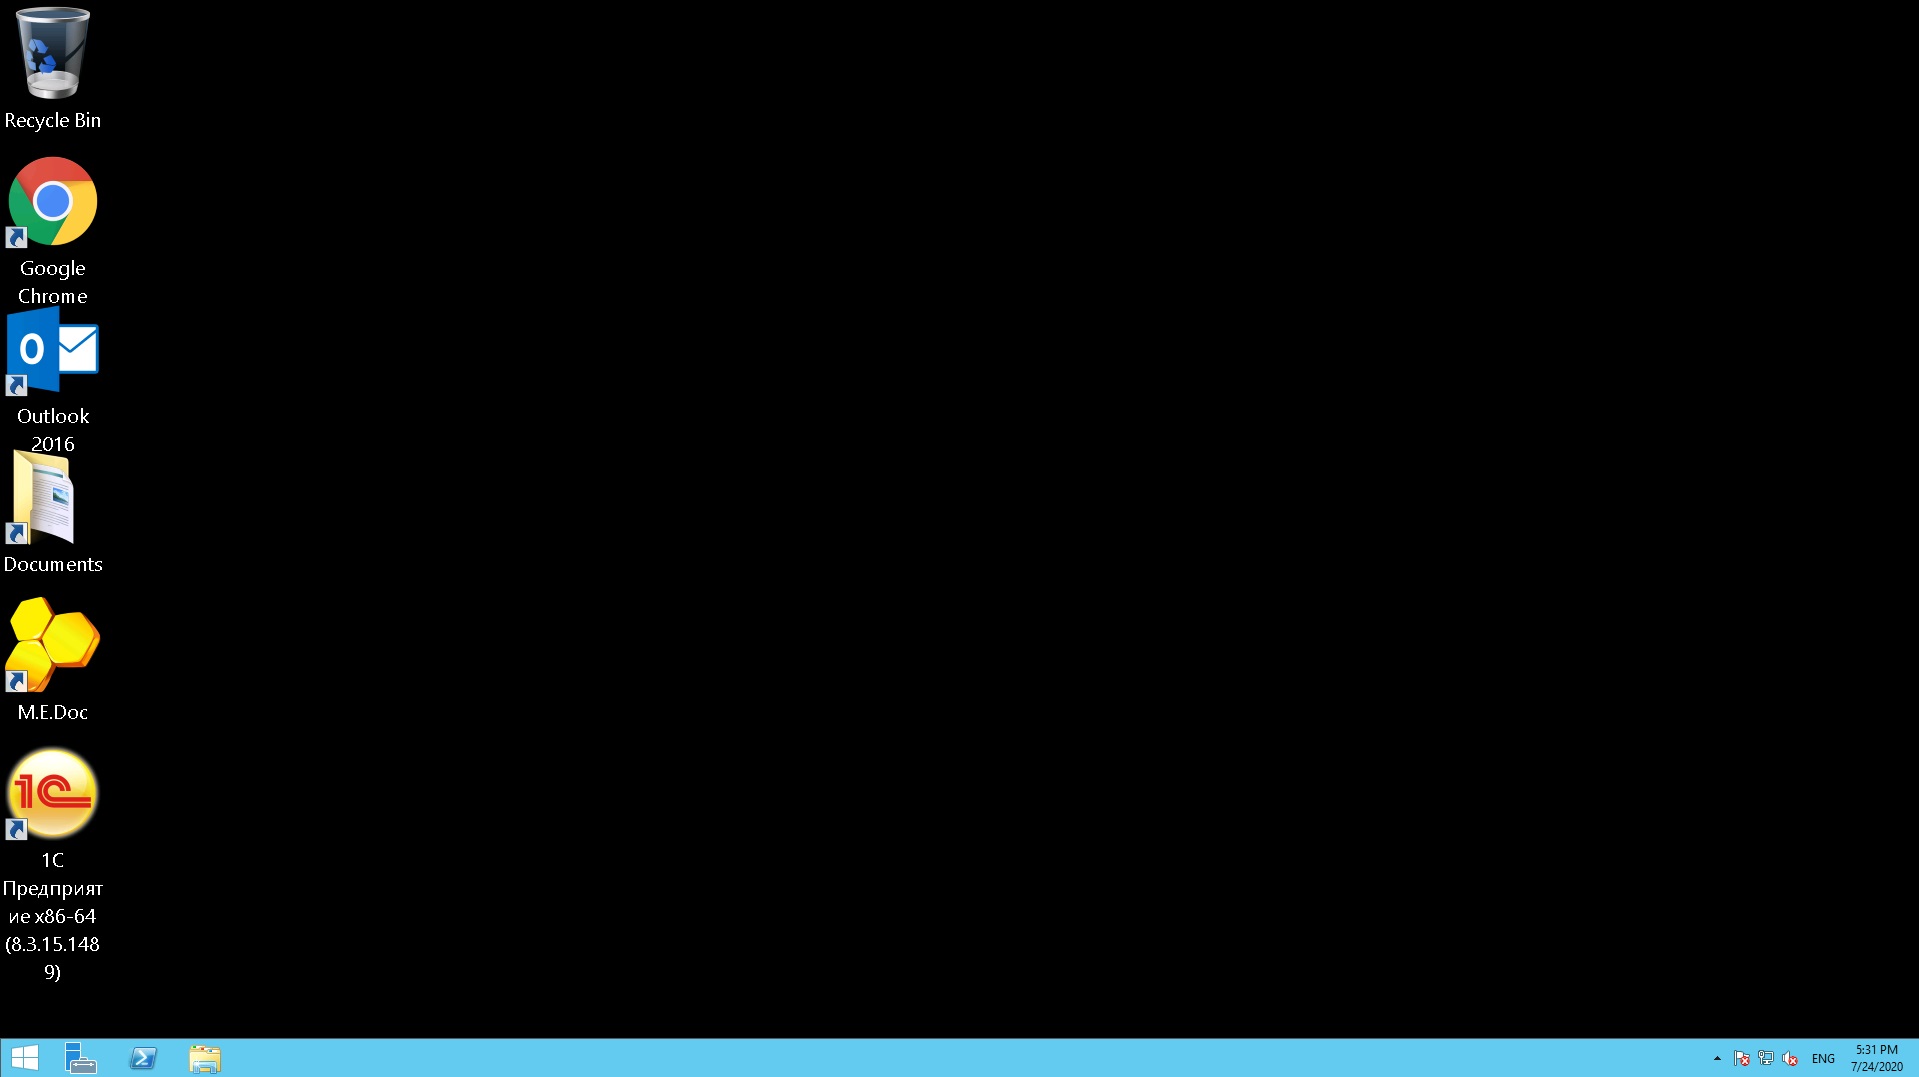
If the operation of other services or the entire team requires different programs and data (for example, standard office programs, corporate mail, IP telephony, documents), the desktop may look like this:
During the installation of most programs, the system will request administrative rights (access details). If the account has administrative rights, no additional actions are required. If the account does not have such rights, you must use the access details with administrative rights or simply assign them to this account. Here we will tell you how to do it easily.
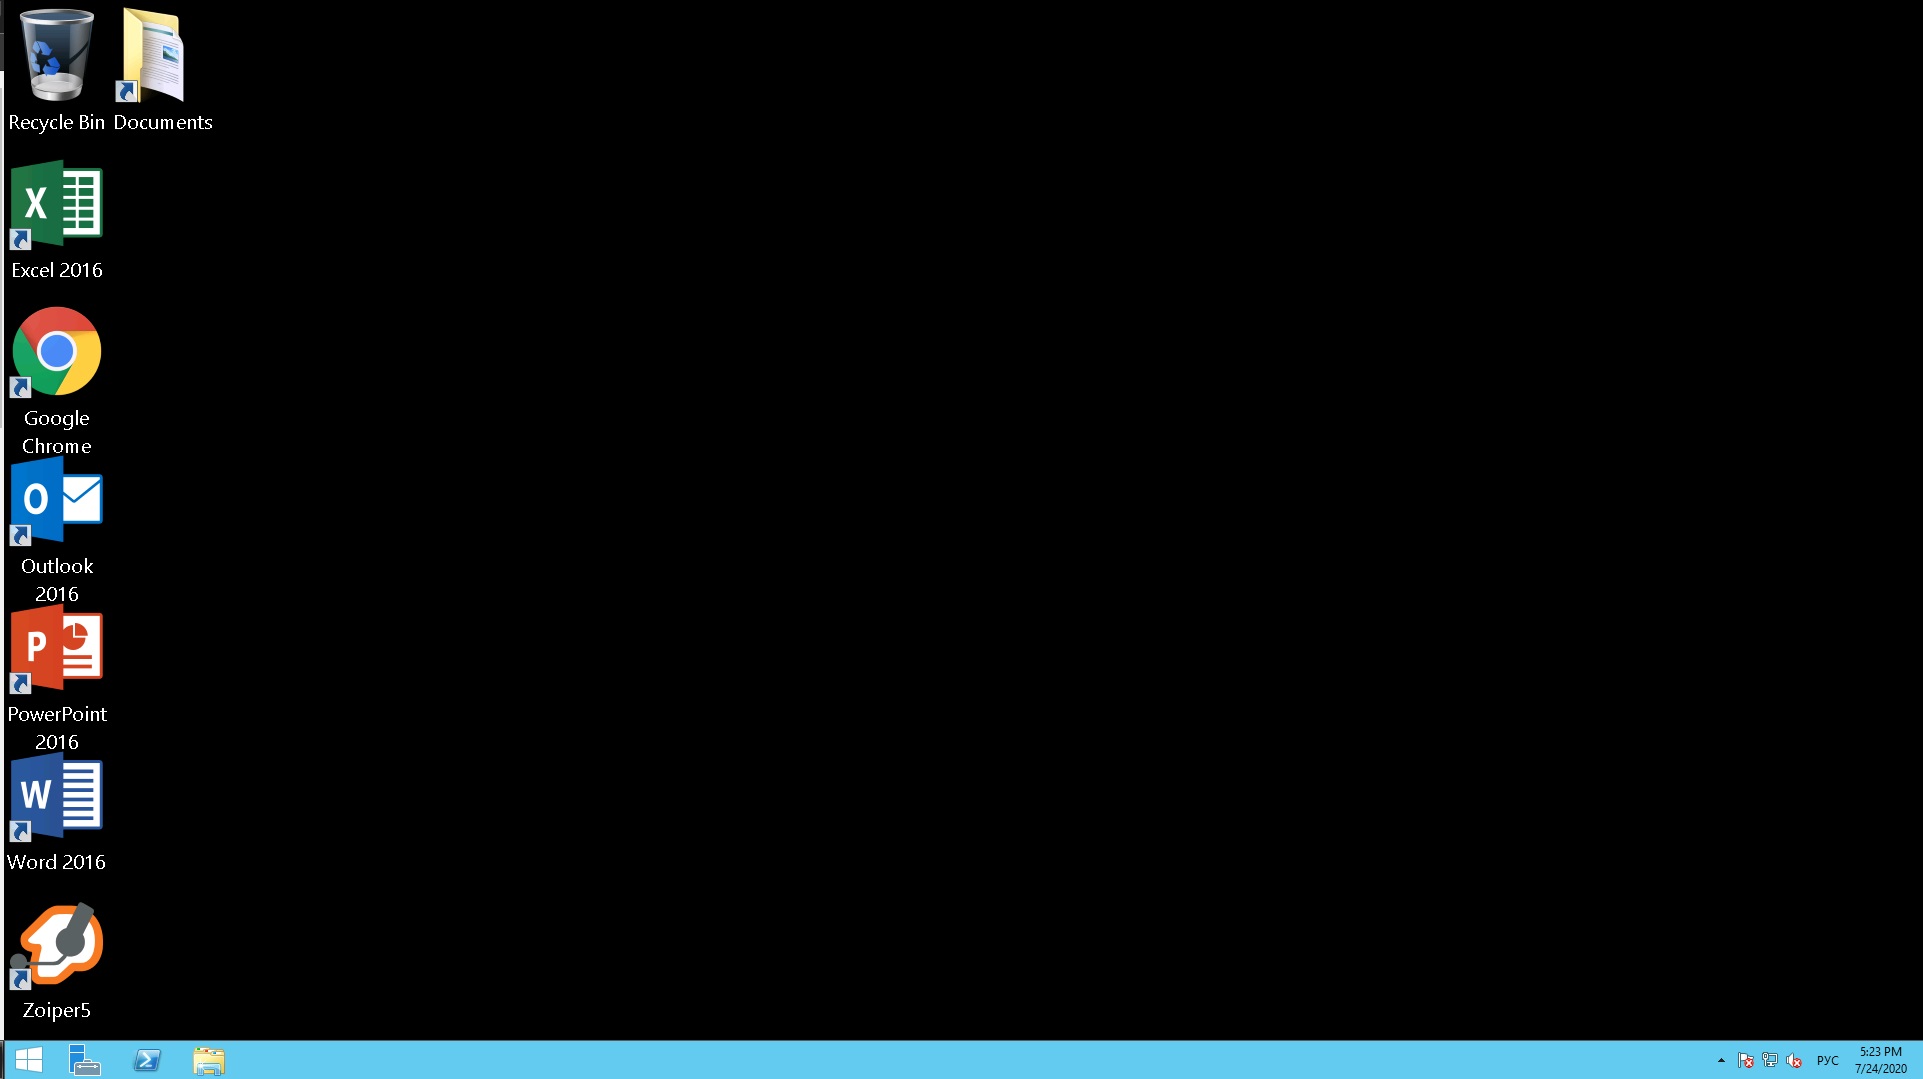
To do this, right-click on the Start menu and select Run. Enter compmgmt.msc in the command line.
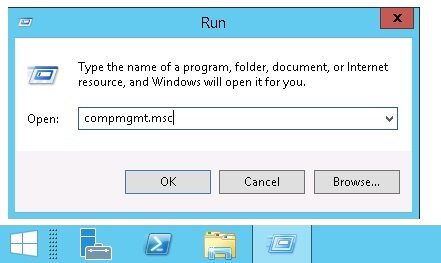
Here select the Local Users and Groups section, then the Users tab. Select the user that you want to assign administrative rights to, right-click on it and select Properties.
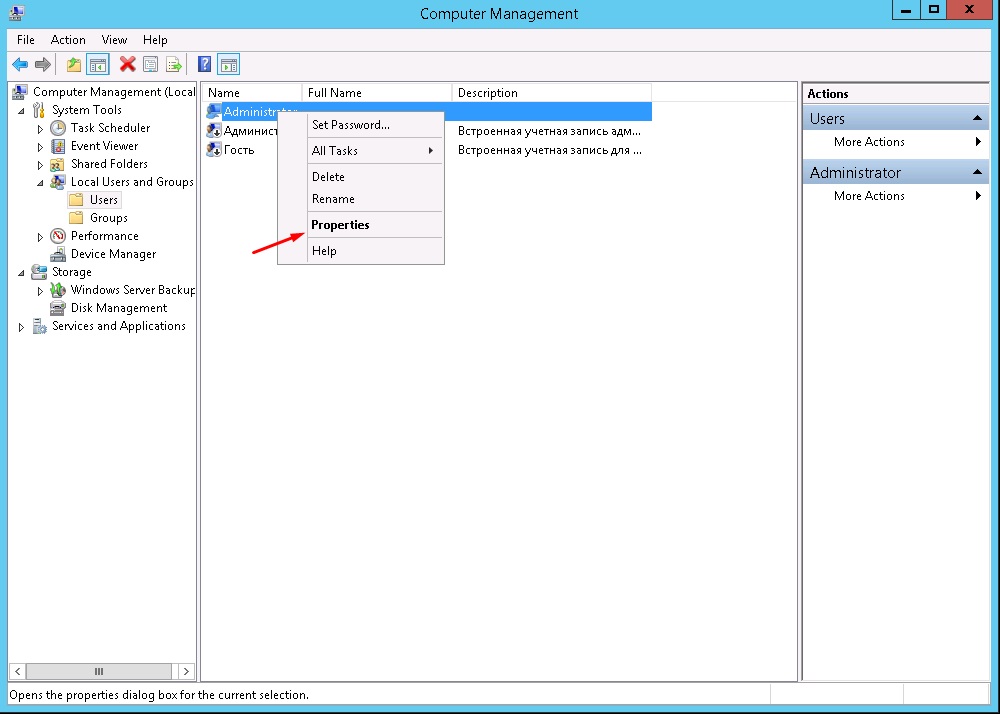
Go to the Member Of tab, click Add, then Advanced, and Find Now.
In the search results, select the group to which you want to add the user, for example, Administrators.

Click OK and confirm the action by pressing the Apply button. Now the selected user has administrative rights. So, from now, they can:
- install any necessary programs on the virtual server;
- install the required updates;
- restart the virtual machine if necessary.
Important consideration: we recommend being especially careful when working with accounts that have administrative rights. Such users may, for example, accidentally delete something on the server or restart the virtual machine. A little care will not hurt for sure. :)
We also recommend you correctly terminate the session on the virtual machine, to avoid an additional load of the server resources. This procedure will not require much effort. Just go to the Start menu, click on the user name in the upper-right corner, and select Sign out. Done!
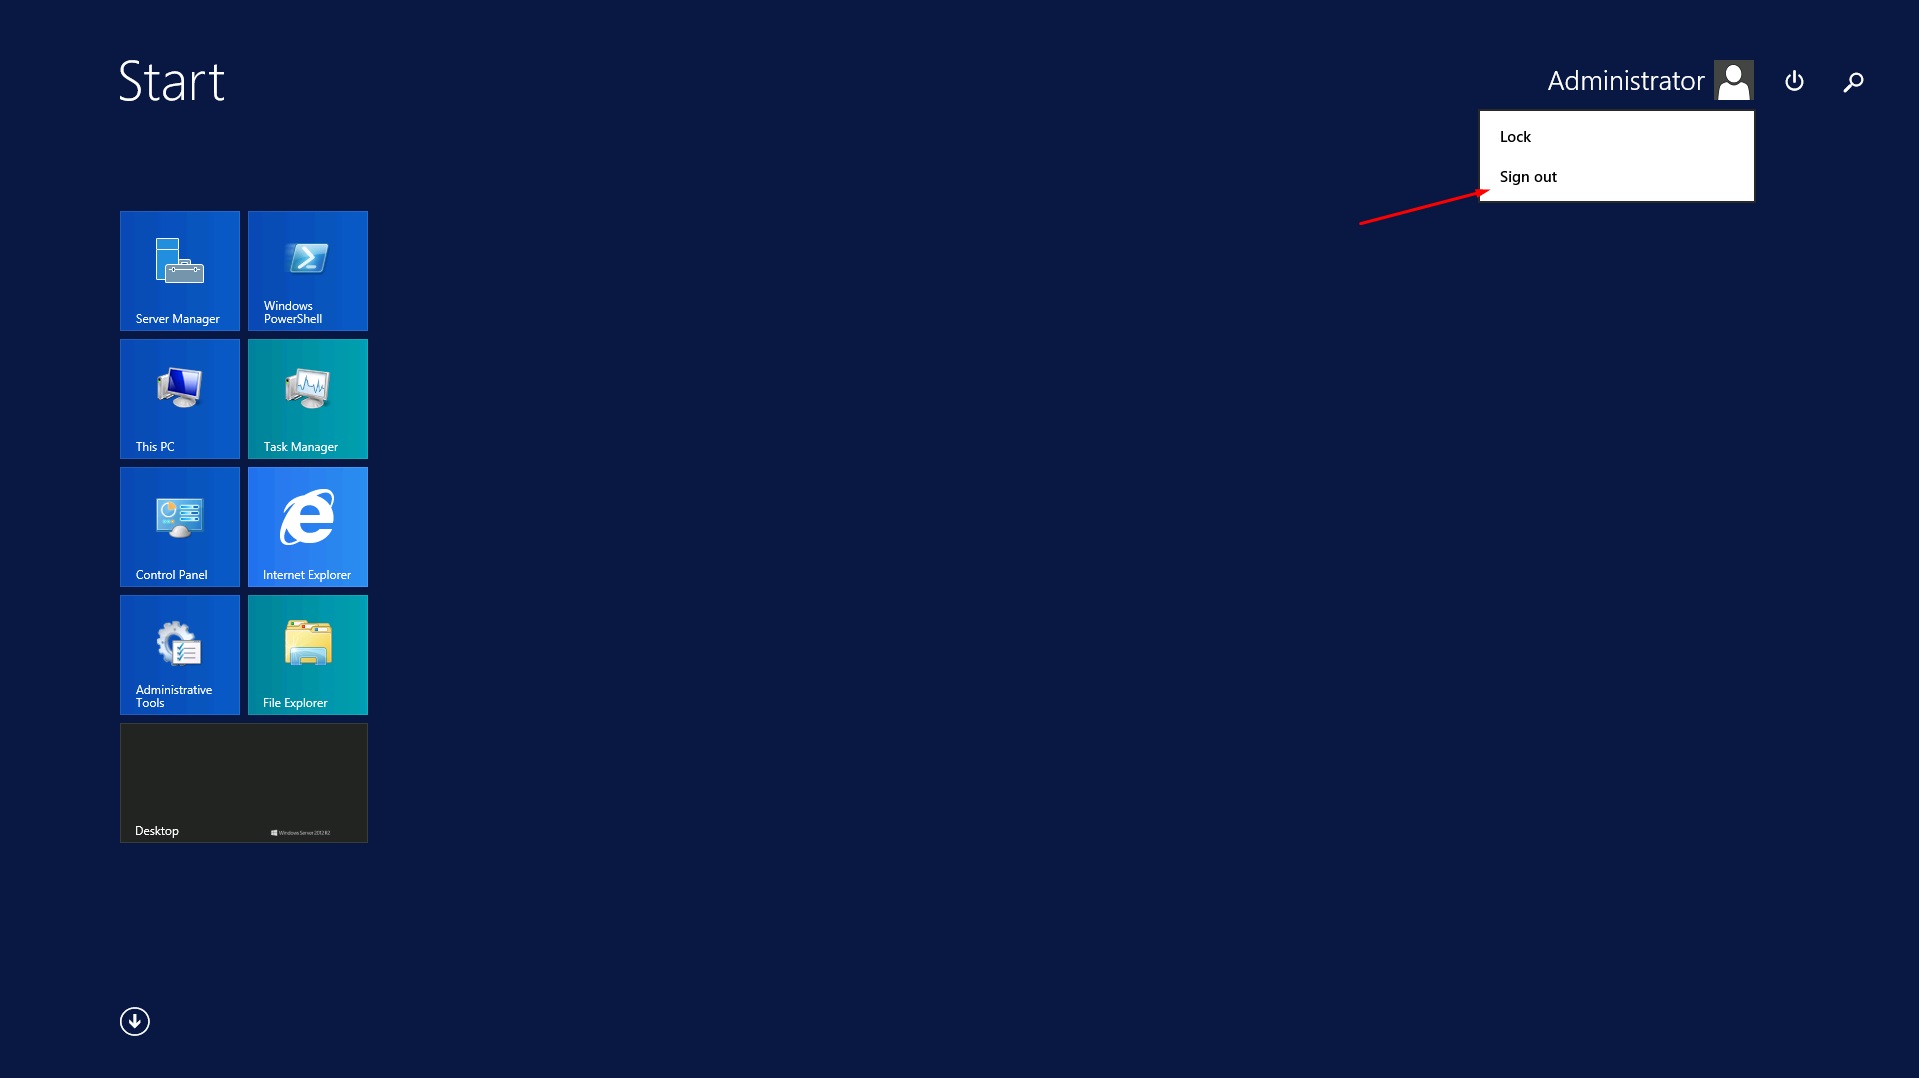
A proper shutdown allows you to completely stop the session and close it in the system.
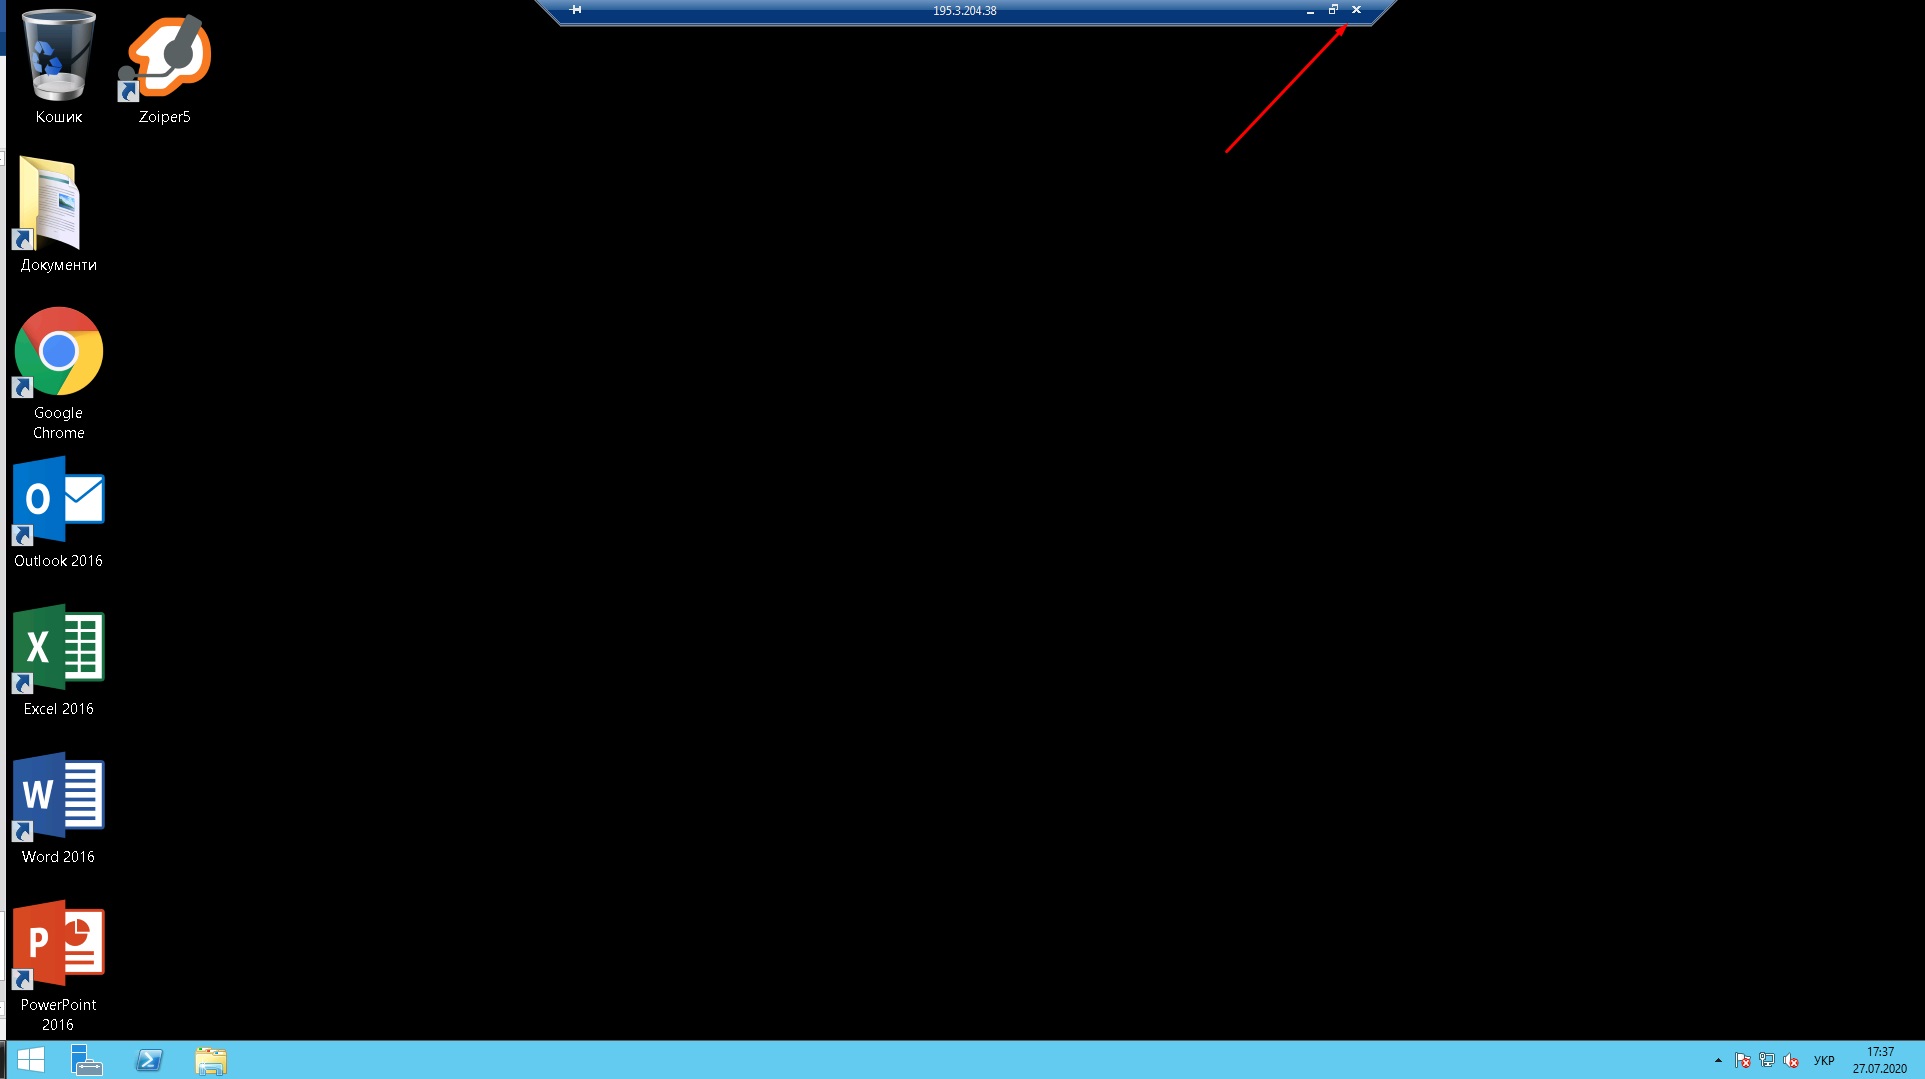
If you still want the session to remain running on the server along with all programs and data, you can close it by clicking the Exit button on the remote desktop connection panel located at the top of the screen.
As you can see, it is quite easy to figure out how to work on the virtual server. In addition to this article, in our blog, you can find instructions, useful technical articles, as well as video tutorials on the YouTube channel. And if you have any additional questions or you need help from our specialists, write or call us! We are always happy to help and do everything to make your work in the Tucha cloud easy and comfortable.


