How to easily use KeePass
- Home
- Blog
- Instructions
- How to easily use KeePass
We often hear that we need to create strong passwords. However, there is neither the time nor the desire to create and memorize complex combinations. In addition, it seems that this is not particularly necessary.
But creating a password that is not easy for hackers to guess is not a whim, but an important cybersecurity measure. But correct storage of passwords also plays an important role. For example, if you write your passwords on a piece of paper or use only one password for all accounts, you personally give your data to intruders. However, this is quite easy to prevent. Password managers will come in handy. Trust your passwords only to specialized apps with a good reputation. In this article, we will look at one of the most common programs for generating and storing passwords — KeePass. We have prepared visual instructions for you: functions, features, and descriptions of the main operations. We will also tell you how to set up and use KeePass correctly.
Password manager — software that helps you work securely with passwords and PIN codes. Such programs usually have a local database or files that contain encrypted password data. Some password managers also work as a form filler. This means that they automatically fill in the user and password details fields in forms. These types of software are mainly installed as browser extensions.
KeePass is one of the first free and open-source managers that has all the basic features of password managers for personal use. The utility supports not only Windows, but also Mac, iOS, Android, and Linux. KeePass itself is stored in a file that can be synced using Dropbox or removable media. In KeePass, the password database is encrypted according to the AES-256 algorithm. In addition, various security methods can be used, such as a master password, a key file, and/or a Windows user account. If you a going to use only the master password to open the database, you must remember it well. If you are going to use the key file, you can select any file. However, we recommend focusing on something that has a large amount of random data. The key file cannot be changed, as this may prevent the database from opening. If you need to use a different key file, you must change the master key and use a new (or different) key file. Key files should be backed up. This is important to avoid difficulties when opening the database in case of a hard disk failure, modification, or recovery.
Let us review another feature of KeePass. This password manager can create a database according to a current Windows user account. If you enable this option, you will only be able to open databases if you logged in with the same Windows account as when you created these databases. However, you can confidently change your Windows user account password: this will not affect the KeePass database.
But remember that there are no backdoors or universal keys that can be used to open KeePass databases!
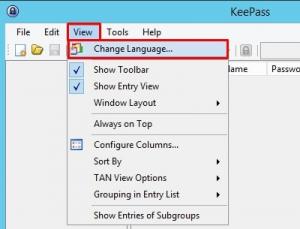
1. The first step in working with KeePass is to configure the software. Initially, the password manager is automatically installed with an English interface. To change the interface language, go to the tab View -> Change Language... and select the desired language:
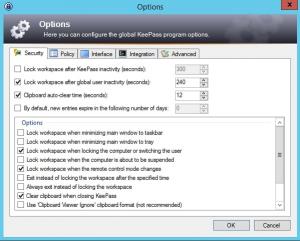
To ensure maximum protection and preservation of the password database, use the special program setting: Tools -> Options -> Security.
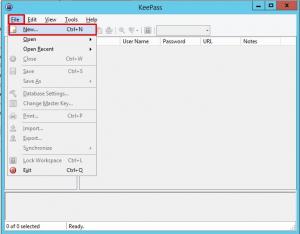
2.Next step is to create a database. To create a new password database you can do this: go to the tab File -> New or use the keyboard shortcut Ctrl + N:
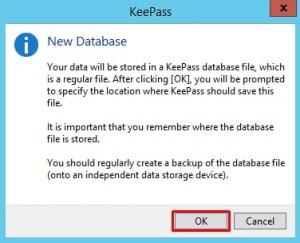
Next, you need to confirm your actions:
After confirming your actions, KeePass offers you to select a location to save the database and create a complex Master password:
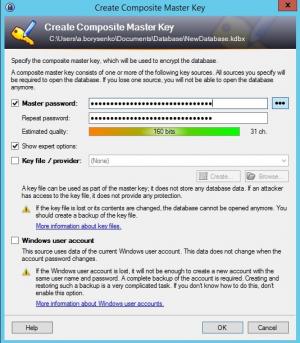
You can also use Key file and Windows user account for additional password database protection (Composite Master Key). Then, to unlock the password database, all the major sources (password, key file, Windows account) if any, will be required.
Next, you can set personalized parameters for the database that you just created, namely: default username, database color, encryption algorithm, and so on. In the program, it looks like this:
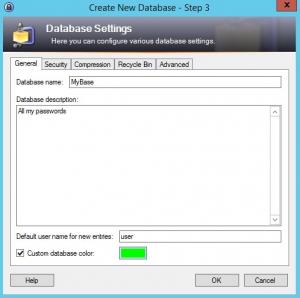
3. Now go directly to working with the database. To save a new password to the database there are several ways to do this: click the appropriate button in the quick access toolbar, go to the tab Edit -> Add Entry or press the keys Ctrl + I:
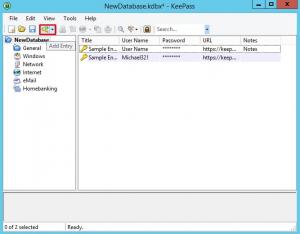
As you can see in the picture, you can specify the following parameters in the database: Title, User name, Password, URL, Note.
In addition, we can immediately change the password display icon:
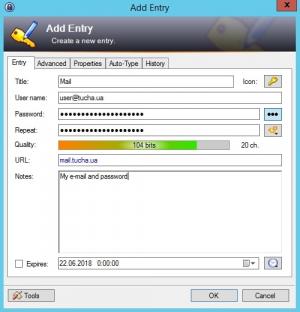
To enter changes to a record that already exists, right-click on it and select the item Edit / View Entry. Or you can do it differently: go to the tab Edit -> Edit / View Entry or press the Return key:
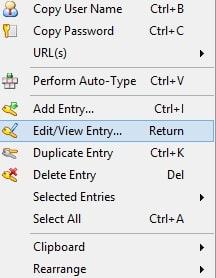
Now let us look at how to copy the username to a clipboard. To do this right-click on the desired entry select the item Copy User Name, or use the keyboard shortcut Ctrl + B. The button on the Quick Access Toolbar is also used for this purpose:

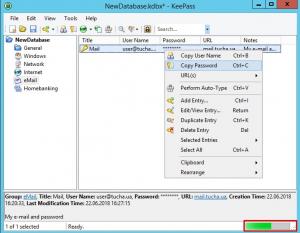
Now we will find out how to copy a password to the clipboard. Right-click on the required entry and select Copy Password. Another option is to use the keyboard shortcut Ctrl + C. To do this, there is also a button on the Quick Access Toolbar that looks like this:

In both cases, in the lower-right corner of the program window, we will see that the counter (bar) of the time during which the data will be available for insertion has started:
You can organize entries, group, and sort. Simple dragging (copying) and creating appropriate groups will help here. To create a new group, do the following steps: right-click on the existing directory or the root one (database name). You can also just go to the tab Edit -> Add Group:
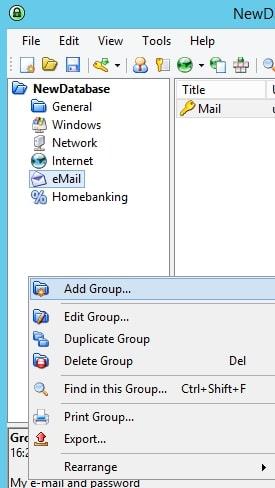
You can easily edit groups, as well as set different names for them, add descriptions, and change icons.
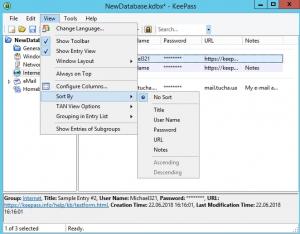
To use additional grouping and sorting functions, select the menu View -> Sort By / Grouping in Entry List
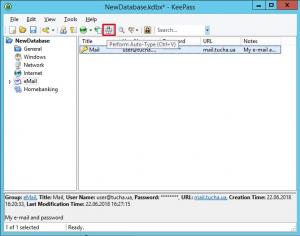
A convenient advantage of KeePass is that you do not have to manually fill in the data in the forms every time since it has forms autofill. To use this option, just leave the first login field active for authorization and switch to KeePass. And the keyboard shortcut Ctrl + V or the button on the Quick Access Toolbar Perform Auto-type will do everything for you and start the autofill process:
So, we looked at the basic actions in KeePass. As you can see, it is not difficult to understand how to work with the password manager. And with our visual instructions, it is even easier! So try this effective tool in combination with our cloud solutions and let your work be safe. If you have any additional questions, you need help or advice about the app and services, call or email us. We are in touch 24×7!


