Testing plan for VPS constructor TuchaFlex+. Mail server on VPS
- Home
- Blog
- Technical Support
- Testing plan for VPS constructor TuchaFlex+. Mail server on VPS
We continue our series of publications about proper testing of Tucha.cloud services. Today we will talk more about fast virtual servers and consider how to organize a mail client on VPS.
What are the benefits of mail in a cloud?
Often companies choose not the most successful ways to place corporate mail due to lack of knowledge or economy. These include storage on physical hardware within an enterprise or using free services such as Google or Yahoo.
In the first case, you have to sacrifice security and safety of the data and tightly bind the mail to a local Internet channel and a power grid, in the second case you have to use the mailer "on thin ice" without flexibility, guarantees of privacy, and forget about full management. This is the case when minor cost savings can lead to the saddest consequences for a business.
But all these risks can be easily avoided if you approach the issue correctly. We recommend you move your mail to a separate virtual server in the cloud.
What are the advantages of this transfer?
- Guaranteed resources and technical support.
- Secure storage of corporate mail on a remote server.
- Full administrator access to mailbox management.
- High speed and stable access to a mail server without being tied to a local Internet and a power grid.
How to set up a mail server?
Most of our users use the control panel of the ISPmanager webserver to work with mail, so we will look at the full procedure using this example.
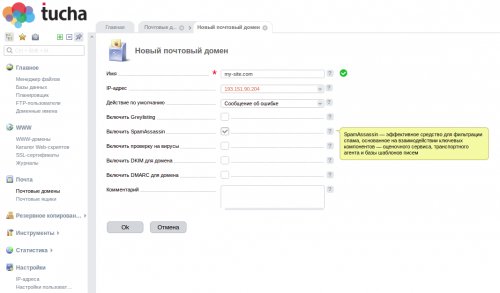
1. Launch ISPmanager and open Mail > Mail Domains. Click Create.
2. Fill in the required fields. Pay attention to Default Action. Here, select what the domain should do when emails arrive at a non-existent mailbox. Save the changes.
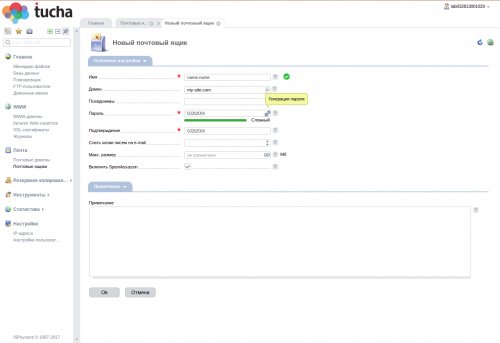
3. Open Mail > Mailboxes and click Create.
4. Fill in the required fields and save your changes. If you need to disable your mailbox in the future, select it and click Off. (blue light).
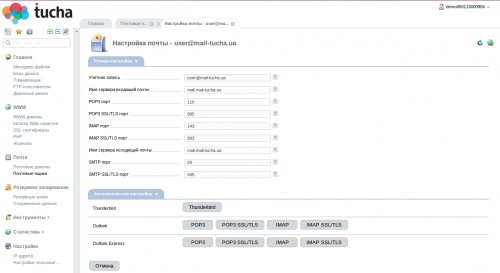
5. Go to mailbox Settings.
6. Add the created mailbox to the mail client.
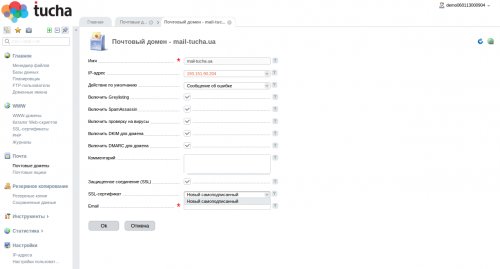
7. Go back to the Mail Domains and click Edit.
8. Activate security features: protection from incoming spam (Greylisting and SpamAssassin), virus checking, DKIM and DMARC verification, SSL certificate (you can use the same one as on the site). Save the changes.
9. If necessary, Greylisting and SpamAssassin can also be activated for individual mailboxes. To do this, open your Mailboxes and click Edit. Then check the appropriate checkboxes and save the changes.
That is all. The mail server is configured on VPS. As you can see, it is not difficult, but so useful. :) By the way, if you do not have a lot of mail yet, it can be placed on TuchaHosting. It is even easier – see for yourself. Anyway, please contact us. We will gladly suggest the best service that will meet your needs. We are ready to consult you 24×7.


